Welcome to Rock Band™ 4! All of the information here will get you ready to rock—in the meantime, check out the DLC store to add new songs to your library and manage any imports. For those about to rock, we salute you!
For each menu screen, text at the bottom of the screen explains the function of the buttons on your controller.
Each player can also access a personal menu by pressing .
Xbox One Wireless Controller
| Previous Option | |
| Next Option | |
| Confirm | |
| Cancel | |
| Custom Menu Options | |
| Open/Close Personal Menu |
Rock Band Wireless Fender® Guitar Controller (Jaguar® or Stratocaster®)
| Strum Bar Up , | Previous Option |
| Strum Bar Down , | Next Option |
| Confirm | |
| Cancel | |
| Custom Menu Options | |
| Open/Close Personal Menu |
Drum Controller
| Previous Option | |
| Next Option | |
| Confirm | |
| Cancel | |
| Custom Menu Options | |
| Open/Close Personal Menu |
If Drum Navigation is turned on as a Modifier in the Settings Menu, then these controls can also be used:
| Previous Option | |
| Next Option | |
| Confirm | |
| Cancel |
With many television and sound setups, the audio and video may play at different times, making it difficult to play the right note at the right time. To calibrate your system, select Settings → Calibration from the Main Menu. From here, you can select Calibrate System to determine your calibration numbers, or select Enter Calibration Numbers to input them manually.
If you have a Rock Band Wireless Fender Guitar Controller, you can use it to automatically calibrate your system. Otherwise, or if you prefer to, you can use Manual Calibration.
IMPORTANT! Many TVs have a picture setting called Game Mode. Ensure this setting is turned ON to improve how quickly the game responds to your actions, which will make calibration more reliable.
Automatic Calibration
You can use Automatic Calibration by opening the Calibration menu while using a Rock Band Wireless Fender Guitar Controller.
To calibrate your system's audio timing, when you are prompted, hold your Rock Band Wireless Fender Guitar Controller up to your sound system speaker or TV speaker (wherever the sound is coming from) as close as possible without touching. The volume should be set to a comfortable listening volume. If you have trouble in a room with a surround system, turning the volume down sometimes helps. Hold your guitar controller there as the green bar fills until you see a check or an "X" mark. If you see an "X," try again with the body of the guitar closer to the active speaker.
To calibrate your system's video timing, when you are prompted, hold your Rock Band Wireless Fender Guitar Controller up to the center of your TV screen, with the guitar controller facing the TV and as close to the TV as possible without touching. This tends to work best in darker rooms, so either turn the lights down or angle the guitar slightly downwards away from the light. Hold your guitar controller there as the green bar fills until you see a check or an "X" mark. If you see an "X," try again with the body of the guitar closer to the screen, or a different angle.
You should now be ideally calibrated! Test out a song in Quickplay to make sure it feels right. If not, try auto-calibrating again, or try calibrating manually.
Manual Calibration
Manual Calibration is available for other instruments and controllers by default. For the Rock Band Wireless Fender Guitar Controller, press at the start of Automatic Calibration to switch to Manual.
For Manual Audio Calibration, each time you hear a drum beat, press , strum, or hit in time with the beat you hear.
For Manual Video Calibration, when you see the needle hit either side of the meter, press , strum, or hit in time with the needle.
Enter Calibration Numbers
If you're familiar with the calibration process, or if you feel you just can't get an ideal calibration using auto calibration or manual calibration, you can try setting your calibration numbers by hand. Select ENTER CALIBRATION NUMBERS from the Calibration menu and tweak each number directly. Here's an approach we recommend to find the best settings:
- You'll need a drum controller or guitar controller to use this method.
- This can be a complicated and time-consuming process, so you may want to attempt one of the other calibration methods first, so you have some decent numbers to start with.
Video Calibration: Choose a song and select Easy difficulty. Mute the volume, and attempt to hit the notes. If you can't hit when the notes are directly over the target, then try hitting the notes when they are ABOVE the target, or BELOW the target.
- If you hit the notes when they are ABOVE the target, try a LOWER video calibration number.
- If you hit the notes when they are BELOW the target, try a HIGHER video calibration number.
Audio Calibration: Now restart the same song, turn up the sound, turn away from the TV, and try to play the song without looking. If you can't hit the notes, try playing earlier or later than what you hear to hit the notes.
- If you hit the notes when you play EARLIER than what you hear, try a LOWER audio calibration number.
- If you hit the notes when you play LATER than what you hear, try a HIGHER audio calibration number.
Repeat these steps until you feel like you've dialed in on the perfect calibration.
To Go on Tour or play Rockudrama, at least one of your band members must be logged into a profile.
Each band has a name and a starting city. You can use the random name and city provided, or change them to your liking. (The starting city does not affect Rockudrama.)
To play in a band, each player will also need to create a band member. Choose your character's name, body type and features. You'll be able to customize your look with clothing and gear as your Career progresses.
If you want to delete a band later, you can do so from the band list.
Manage Band
On the Manage Band menu, you can rename your band, and choose Stand-Ins to fill in on instruments that players aren't playing.
Game Options are located in two places:
- Settings accessible to all players and a handful of Game Modifiers are located on the Settings Menu, available from the Main Menu.
- Settings specific to an individual player are located in their Personal Menu, which you can access by pressing .
Left-handed?
Use the Lefty Flip option in your personal menu to flip the contents of your Guitar/Bass Track or Drum Track. (And flip over your actual guitar, too!)
You can choose songs to play from the Music Library. Press to change the sorting, or hold to bring up a list of filters to find the exact songs you want. You can also press and to assign a rating to a song, to keep track of your personal favorites.
After choosing a song, each player uses their personal menu to choose the part for their instrument (such as guitar or bass, for a guitarist) and its difficulty level.
To play guitar or bass, hold down the fret button that corresponds with the next note that will pass through the target. As it passes, strum up or down on the strum bar to play the note. If you see several notes of the same color in a row, you can keep the correct fret button held down and strum only when the note passes the target.
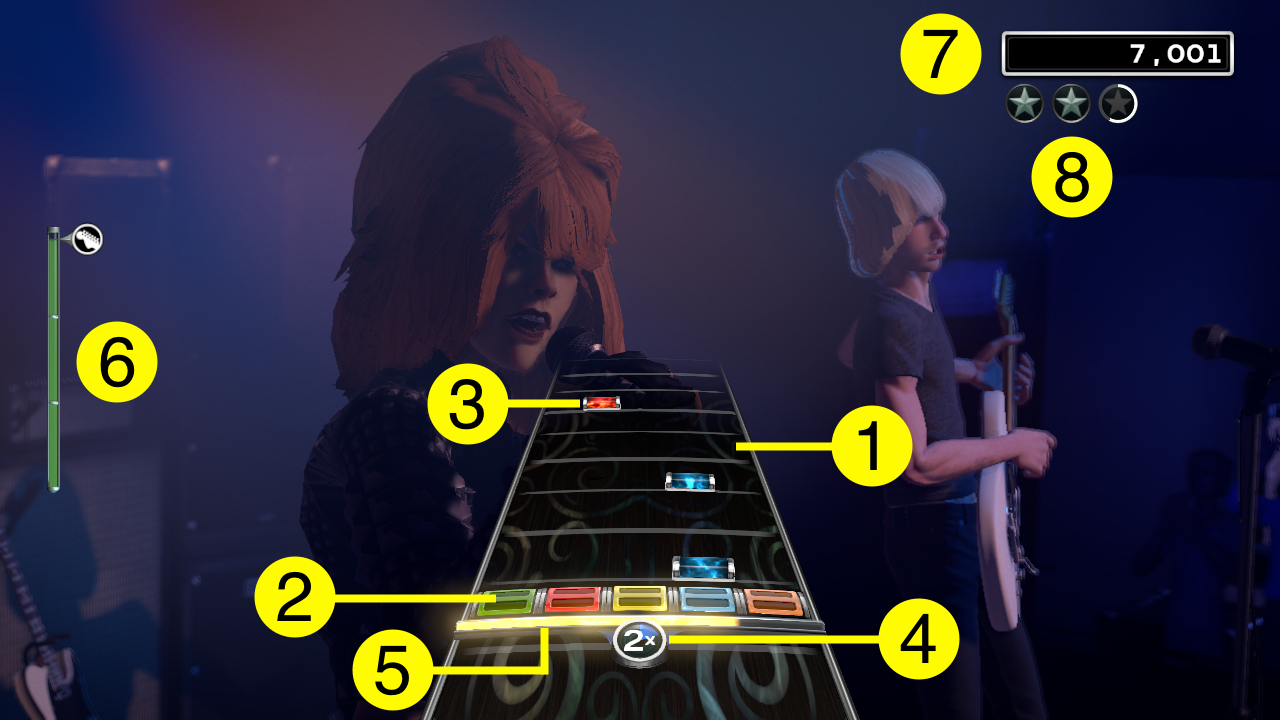
- Guitar Track
- Target
- Notes
- Streak Meter and Multiplier
- Energy Meter
- Crowd Meter
- Score
- Stars
When playing chords, you'll need to play more than one note at the same time. Don't panic, you'll be fine. Just press down the correct fret buttons simultaneously and strum when appropriate.
Sometimes smaller-looking notes will appear on the track—these are Hammer-On/Pull-Off Notes. If you've successfully played a note before one of these, you can play a "HOPO" note by pressing the proper fret WITHOUT strumming.
When you see a series of notes surrounded by their own colored ring on the track, you can play these without having to worry as much about timing.
Customize your sound during long notes by reaching for that whammy bar. To use the whammy bar, press it in towards the guitar. This bends the notes you're playing and gives your tone some depth.
Think you're worthy of wielding the mic? Plug in your USB-compatible microphone and prove it as the vocalist. Go solo or sing in harmony with two backup singers. Use Freestyle Vocals to sing between the notes and improvise a new melody.
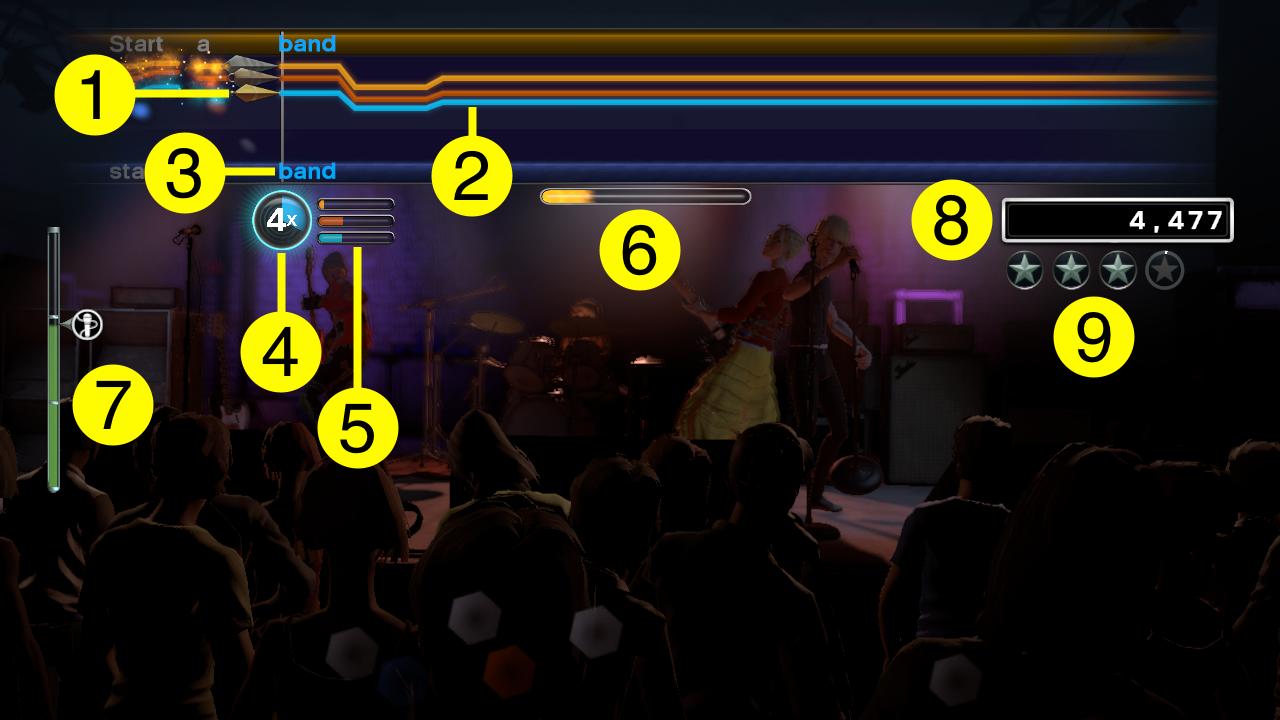
- Pitch Indicator
- Note Guides
- Lyrics
- Streak Meter and Multiplier
- Vocal Part Meters
- Energy Meter
- Crowd Meter
- Score
- Stars
Sing the words as they pass the bar on the left side of the screen. Follow along with the note guides. Each microphone controls a different arrow, with a unique shape and color.
The pitch indicator shows you the pitch you're singing. If a song is out of your range, you can always sing an octave higher or lower. As long as you're singing the right note, you're still on the money.
You can also control how much—or how little—you hear yourself or the original artist by selecting Instrument Options from your personal menu.
Percussion Notes
Sometimes when you're not singing, large round notes will come down the track. Tap your mic against your other hand to play these percussion notes.
Vocal Harmonies
Up to three singers can perform at once, using separate microphones, with either Solo or Harmonies selected as their part. For Harmonies, each player can sing any of the parts shown for the song. Each vocal part is distinguished by a different color of note guide.
Freestyle Vocals
When playing Solo Vocals on Hard or Expert Difficulty, singers can ignore the original melody and sing any of the pitches indicated by the guide lines across the track. These lines are notes that are harmonious with the structure of the song, giving you cues to improvise your own unique melodies. When you successfully sing in tune with a cue, its line will glow.
Freestyle Vocals are available for songs that support it, as indicated in the Music Library. Freestyle Vocals can also be turned off by selecting Instrument Options from your personal menu.
Keep the beat like a human metronome by hitting the correct colored drum pad when the matching note crosses the target.
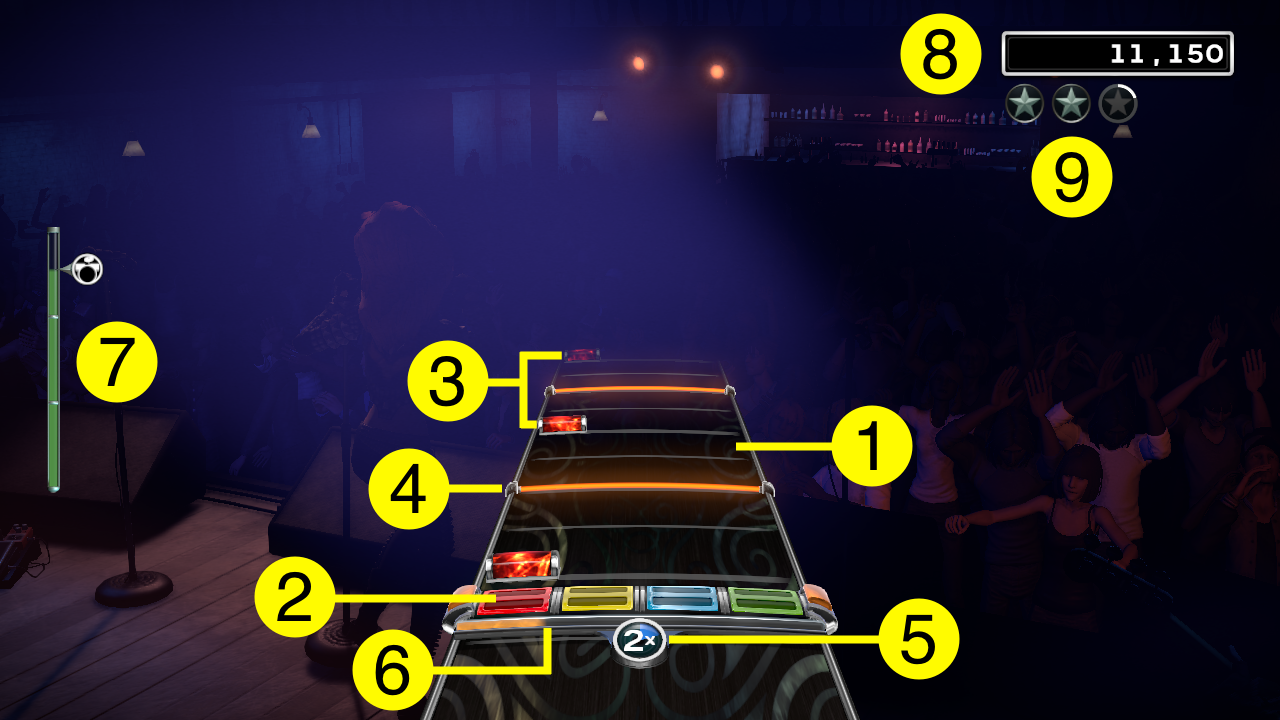
- Drum Track
- Target
- Notes
- Kick drum note
- Streak Meter and Multiplier
- Energy Meter
- Crowd Meter
- Score
- Stars
The wide orange notes are for the kick pedal—stomp on that bad boy when these notes cross the target.
When you see a series of notes surrounded by their own colored ring on the track, you can play these without having to worry as much about timing.
Pro Drums
If you have Rock Band Pro-Cymbals plugged into your Rock Band Drum Controller, you can select Pro Drums as your part and take on a more realistic drum experience. When playing Pro Drums, you must hit the cymbals when special, cymbal-shaped notes cross the target.
If you have fewer than three cymbals, select Instrument Options from your personal menu, and use the checkboxes to indicate which colors are assigned to cymbals.
Score and Stars
As your points increase, you earn stars—up to five total. Expert players can earn gold stars!
Streak Meter and Multiplier
Play flawlessly to fill the meter and start a score multiplier. Bassists can earn an even higher multiplier for keeping a steady groove!
Crowd Meter
Keep an eye on the crowd meter—it tells you how much the audience is digging your performance. Miss too many notes and the crowd meter will slip into the red. When it's completely empty, you get kicked off the stage.
If your band wants a more casual experience, turn on No-Fail mode via Instrument Options on their personal menu. On Easy difficulty, No-Fail mode is automatically turned on.
At the end of some songs, you'll have the opportunity for a Big Rock Ending. Shred on guitar or bass, or bang away on the drums like there's no tomorrow. But watch out for the notes at the end of the track!
If you're playing as a band, then Big Rock Endings occur for all instruments. If you play a Big Rock Ending, you'll get a major score bonus—but only if you land those last notes.
Not all songs have Big Rock Endings, so take advantage of the ones that do.
Build up your energy meter to go into Overdrive. Then you can whip the crowd into a frenzy, rack up some serious points, and even save yourself or a bandmate! While your energy meter drains, the crowd goes nuts and your points skyrocket.
Guitar/Bass
To build up your energy as a guitarist or bassist, nail the special glowing white note phrases to fill up your energy meter. When the meter is at least half-full, you can use your energy to go into Overdrive by tilting your guitar upwards, or pressing or . (If you see a special long glowing note, then whammy that sucker to fill up your energy meter at an even faster rate.)
Drums
To build up energy as a drummer, nail the special glowing white note phrases to fill up your energy meter.
Drum fills unleash the energy in your energy meter, driving the crowd wild. At the end of the drum fill, you'll see a unique, green crash note appear. To use your energy, nail that green crash.
There are three types of fills, depending on how you like to play:
Dynamic Fills: Each time you play a song, you'll need to bust out unique fills that put a twist on a familiar song. Think fast and play perfectly for bonus points.
Static Fills: Play the fills as they were recorded. Hit every note for bonus points.
Classic Fills: If you see four solid color bars appear on the screen, then that's your cue to improvise whatever drum fill you want. (These fills work best on home theater setups with low calibration numbers.)
Vocals
To build up energy as a vocalist, when you see a special glowing phrase, sing those sections as accurately as you can and you'll gain energy to fill your energy meter. To use your energy, look for special lit-up yellow sections without note guides—called Freestyle Sections—and just belt something out to go into Overdrive! You're the singer after all, so improvise something.
Saving Bandmates
Got a bandmate who's having an off night? Go into Overdrive, get the crowd moving, and save your band's career—all at the same time.
If a bandmate fails during a performance, then you can bet the crowd is gonna notice—it'll bring down your band's crowd meter. But here's the good news: you can bring them back by using your energy. Go into Overdrive to bring your bandmate back and keep the show going!
Players on Easy difficulty are protected from failing out.
Freestyle Guitar Solos let you add your own creativity into the mix! Freestyle Guitar Solos are available for songs that support it, as indicated in the Music Library.
To learn more, connect a guitar controller and then choose Training from the Main Menu. You'll see two freestyle guitar tutorials that will help you on your way.
During guitar solo sections, there won't be any notes on the track. Instead, you'll see a series of patterns that tell you what you need to do to earn maximum points.
If you see a long, solid line, that means to play a sustained note. Any fret is fine—just strum once and hold it!
If you see a series of horizontal lines, try to strum at the same pace as they pass through the target. Sometimes they appear close together—that means you need to strum really fast!
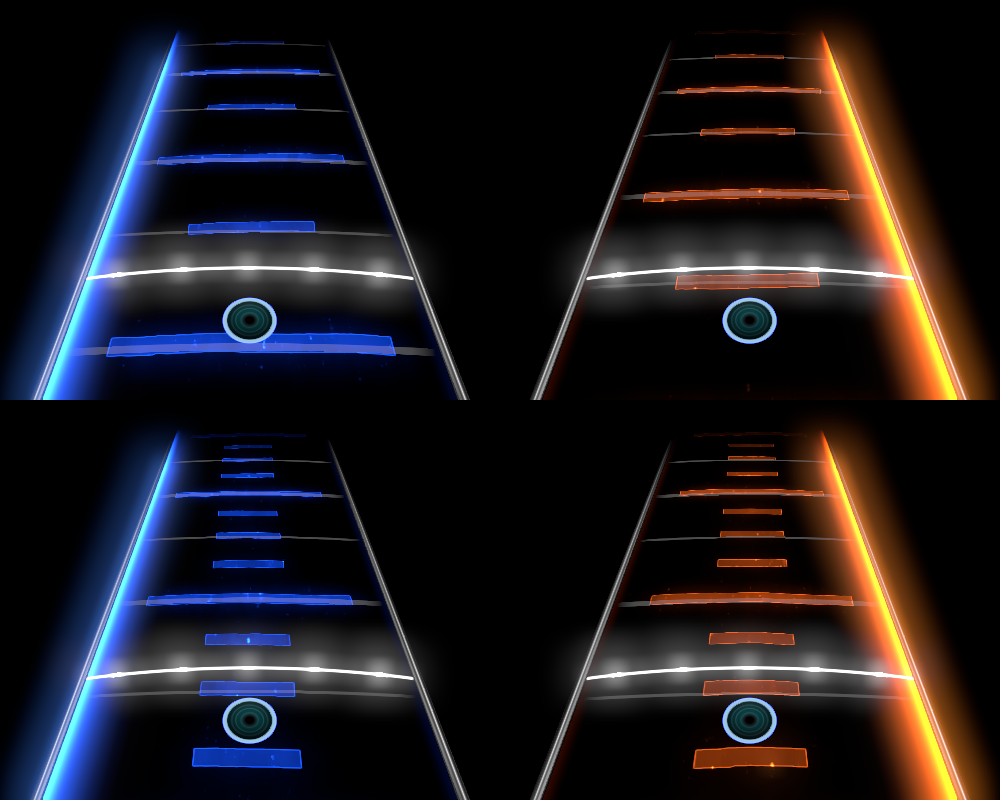
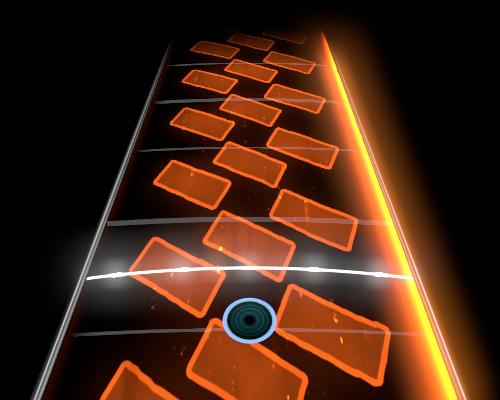
If you see little rectangles in groups of three, it's time for a tapping solo. Hold down one of the high fret buttons (the smaller ones closest to the body of the guitar), and then tap on the rest of the frets with both hands.
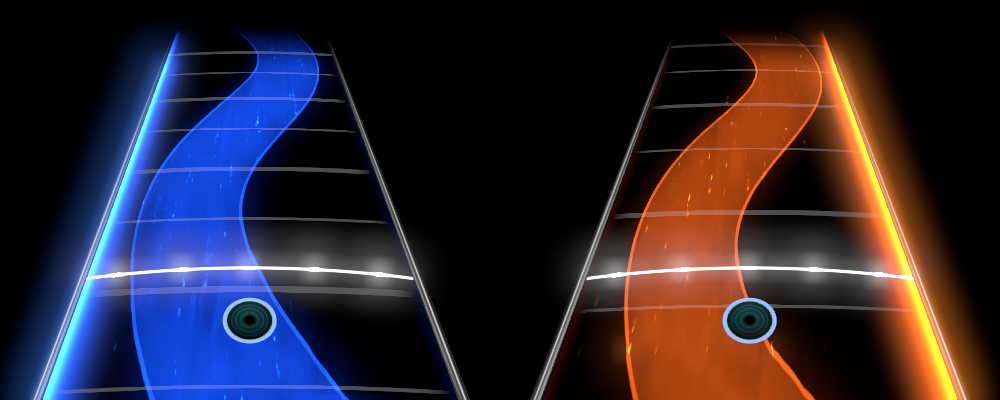
If you see a long curve, you can play feedback. Play any note and then tilt the neck of the guitar up, as if you're going into Overdrive.
If you see a multi-colored pattern, that means you can play anything! Go nuts.

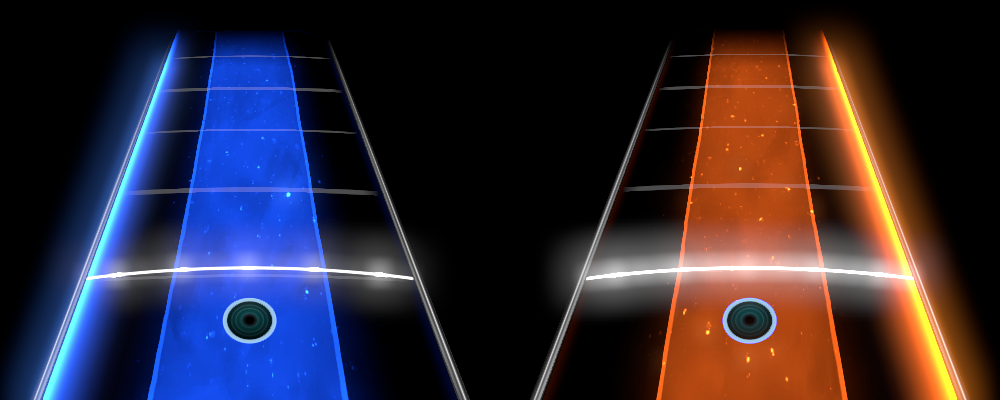
If the pattern is blue, you should play on the low fret buttons (the larger ones closest to the headstock). If the pattern is orange, you should play on the high fret buttons (the smaller ones closest to the body of the guitar).
Finally, if you'd rather just go wild without anyone telling you how to play, go to the Main Menu, select Modifiers from the Settings menu, and uncheck Guitar Solo Cues. You won't be scored for your Solo, but you can play whatever you want!
In Quickplay mode, you'll see all of your songs in the Music Library. You can pick songs one at a time and go for a high score on the leaderboards!
Choose a whole list of songs and play them all in a row. You can even save your setlist for later, or shuffle it up!
Wanna start a Rock Band party? Shows let you jump right into the action and keep the music coming. Just pick a song, choose your difficulty, and you'll be up on stage in no time.
Voting
In Play a Show mode, you'll have the opportunity to vote on each set of songs you want to play. Just press the button that corresponds with the song or category you want to play. The next song will be randomly selected from all of the votes that are cast.
At the end of each set, you can choose whether you want to keep playing and vote on more songs, pick songs directly from the Music Library, or finish your show. When you end a show, you can even choose to end with an encore!
Think you're a serious Rock Band player? In Brutal Mode, notes will become invisible as they come down the track. The better you do, the quicker they disappear.
But that's not all! While in Brutal Mode:
- Everyone has to play on Expert
- No-Fail Mode is turned off
- Freestyle Vocals are turned off
- Freestyle Guitar Solos are turned off
Do well enough and you might earn the elusive Crimson Stars, or even end up on the Brutal Mode-exclusive leaderboards!
Check on your Rock Band progress by bringing up your personal menu with and selecting My Stats.
Here you can see your total score for all Rock Band 4 disc songs, the number of stars you're earned, and how many Gold Star, Crimson Star, and Full Combo performances you've had. You can also compare stats with your friends, or with the Rock Band community at large.
If you have the Rock Band Rivals expansion, you'll get some additional stats:
- Skill measures how good you are at Rock Band. Each instrument has its own rating ranging from 0 to 1000. Every time you get a high score on a song, it contributes to that instrument's Skill. Perform well on higher instrument difficulties to increase it!
- Level measures your amount of Rock Band experience. Every song you play earns you XP, and you can get bonus XP by participating in Weekly Challenges (see below). When you get enough XP, your level will increase.
Rivals is only available with the Rock Band Rivals expansion.
Rivals is a new way to compete with other Rock Band players! Join or create a Crew with up to nine friends, then compete in Weekly Challenges for supremacy over rival Crews. Work your way up the Tier ladder from Bronze all the way up to the prestigious Bloodstone Tier!
To get started with Rivals, select Career → Rivals from the Main Menu. The first time you go here you'll be prompted to either join a Crew or create your own; after that you will see your Crew's profile screen.
During each Weekly Challenge, there are two ways to help your Crew out. First, earn as much XP as you can by playing songs that fit the weekly theme. This might be a certain genre, or decade, or really anything—it changes from one Weekly Challenge to the next! Second, get the highest score you can on the three Spotlight Songs. You can jump right to the qualifying songs from the Crew profile screen—no need to back all the way out to the main menu!
At the bottom left of the Crew profile screen is the Tier Status meter. This will show you your Crew's status during a Weekly Challenge. Your crew's XP earnings and Spotlight songs are each given a number between 0 and 100, based on how you're doing compared to other Crews in your Tier. The number in the circle is the average of those two numbers.
When the Weekly Challenge ends, this number will be converted to Rivals Points and awarded to your Crew. If you earn enough, you'll be promoted to the next Tier to face stiffer competition in the next challenge—but if you don't earn enough, you may drop down a Tier.
Keep in mind that every Crew in your Tier is vying for a limited number of promotion slots. Just because you're sitting pretty at the beginning of a Weekly Challenge doesn't mean you can get complacent—you could be unseated at any moment!
At the top right of the Crew profile screen is your Crew's Activity Feed. This will let you know everything important that's going on with your Crew—who's posting the high scores, who's getting all the XP, and how you did in the Weekly Challenge. If you press on a message about someone's accomplishment, you can send them some congratulations (or gentle encouragement).
At the bottom right of the Crew profile screen is your list of Badges. There are two kinds: Crew Badges and Individual Badges. You can earn Crew Badges by participating in Weekly Challenges, and earn Individual Badges by being a top performer in your Tier.
Rockudrama is only available with the Rock Band Rivals expansion.
Rockudrama is an all-new story mode. It's the first playable rock documentary, where you and your band group up, start gigging, and find your way through your very own story on a fictional TV show called Beneath the Tuneage. To get started, go to Career → Rockudrama from the Main Menu.
Your band's Rockudrama story is broken up into multiple parts, and each part is made up of shows. When you play a show, the stars you earn are converted into Fame. Get more Fame by playing on higher difficulty levels!
At the end of each part of the story, you have to have a certain amount of Fame in order to continue. If you don't have enough, you'll have to try that part again. If you get a ton of Fame, though, you can "go premium" on the next part. Premium parts have unique story paths and offer more Fame per show.
On some shows you'll have the opportunity to bet on how many stars you think your band can earn. If you meet or exceed your wager, you'll get bonus Fame. You don't get anything extra for overshooting your bet, though, so choose wisely!
Sometimes you'll also get other special opportunities for extra Fame, like additional challenges that change the rules of the game. Earn as much Fame as you can to get better Rock Shop rewards at the end of the story.
In Career mode, you can create your own band and craft its story.
Shows are a collection of songs you play in one venue. Tours are a series of shows, each in a different city; from your hometown to your region, eventually they will take you around the world.
Each time you play a Show in this mode, you will earn stars, cash, and fans. Certain shows may also earn you clothing and gear!
- Stars are used to unlock new Tours, and impact how much cash you earn for a show.
- Cash lets you buy new stuff in the Rock Shop. You can purchase new instruments, new clothes, and more.
- Fans will unlock special Fan Showcases, which are extra shows that award killer gear. Fans can also unlock Tribute Shows that feature your downloaded songs. The more songs you own, the more Tribute Shows you'll unlock!
Different shows let you choose songs in different ways. You might play a pre-made setlist, or choose from a list of songs, or vote on a random selection of tracks from your entire Music Library.
Each band starts without any money or fans. You always wanted to be a starving musician, right? Now you can do it as many times as you want!
If you are playing with multiple profiles in one band, only the band's owner will earn progress, cash, and fans, but everybody who is playing will get gear when it's awarded.
The World Map
You can play shows in various cities around the world. Choose a city from the list provided to see what shows you've unlocked there.
As you play more and go on tour, you'll unlock new cities and shows to play on the World Map.
Tours
Once you've earned enough Stars, a new Tour will start in one of the cities you have played in. Choose a new tour from that city's list. Choose wisely—which Tour you choose will affect what kind of shows you'll play and what cities you'll visit, not to mention the direction of your band's story! Some Tours might be all about the fans, others could be a greedy cash grab, and some will earn you valuable instruments or outfits that you would have to buy otherwise.
Each Tour will take you through a series of shows in cities around the world. You have to play them in order, but the cities you visit will become available on the World Map, and you can replay the shows from each Tour later if you want.
If you fail a song during a Tour, you can't go try it again—the audience won't stand for it! You'll just have to soldier on and do the best you can. Later, if you want, you can try to go back and play the show again once the Tour is complete.
Stage Presence
During Career mode, your accomplishments can earn you Stage Presence awards. You can earn them for performing with skill and style, and for being in sync with your bandmates. During Career mode, Stage Presence can earn your extra fans! Here are the ways you can earn "SP":
Band Awards:
- CROWD PLEASER: Choose a requested song.
- BAND OVERDRIVE: Coordinate your Overdrive deployment.
- FULL STREAK: Maintain a maximum streak together.
- BAND UNITY: Hit multiple unison phrases.
Bassist Awards:
- GROOVE IT OR LOSE IT: Maintain a Bass Groove.
- STANDOUT SOLO: Play an almost flawless solo.
- UP & STRUMMING: Strum up on most bass notes.
Drummer Awards:
- FULL-FILLED: Successfully play Dynamic Drum Fills.
- STANDOUT SOLO: Play an almost flawless solo.
Guitarist Awards:
- STANDOUT SOLO: Play an almost flawless solo.
- HAMMER IT HOME: Play a long stretch of hammer-ons and pull-offs correctly.
Vocalist Awards:
- EXPRESS YOURSELF: Sing complementary notes outside of the main melody line.
- IN HARMONY: Sing all of the harmony parts for several phrases.
Freestyle Guitar Solo Awards:
- UP TO SPEED: Consistently play fast notes in Freestyle Guitar Solos.
- STEADY HAND: Consistently play medium notes in Freestyle Guitar Solos.
- WORTH A LICK: Press and play different combinations of frets in Freestyle Guitar Solos.
- FANCY FINGERS: Correctly play the tapping section during Freestyle Guitar Solos.
- HOLD ON: Play lots of held notes in Freestyle Guitar Solos.
Any Instrument Awards:
- SUPER SAVER: Save your bandmates more than once.
- 5-STAR SCORE: Earn a 5-star solo score.
Rock Shop
Shows and Tours will earn you cash to spend on cool outfits and gear. To buy this gear and change your outfits, go to the Rock Shop from the main tour menu or from your personal menu.
Special clothing and gear unlocked by Shows and Tours will also appear in the Rock Shop. Some shows will award you items directly, while other shows will unlock items that you have to purchase if you want them. Finishing the campaign will unlock everything, although you might not be have enough money to buy it all!
To access the Rock Band Music Store, select GET MORE SONGS from the Main Menu. Here, you can search or browse through the full list of songs available for purchase. Check back often to see what songs have been added!
You can add songs to your Wishlist so you can view and purchase them later.
The Search function lets you easily look for the songs you want. Enter all or part of a song title or artist name, and the game will serve up all the songs that match.
Importing from Past Games
Songs that you've purchased, or exported from disc to your Xbox 360 Music Library, can be downloaded to play in Rock Band 4.
To do this:
- Navigate to "GET MORE SONGS"
- Browse or search the Rock Band Music Store for your content. Songs or packs that you have previously purchased for your Xbox 360 console that are playable in Rock Band 4 should show up as "Free." Select the song you wish to import. The free Rock Band 4 version of your content will begin downloading.
- If your content is not labeled "Free" in the Rock Band Music Store, search for the content via the Xbox Games Store.
For additional support, visit www.rockband.com.
NOTE: Not all Rock Band catalogue songs may be available in Rock Band 4 at the time of your visit to the Store. Songs will be released for download as they become available. Visit www.rockband.com for more information.
Struggling with a difficult part? Go to Training → Practice Mode from the Main Menu and you can work on specific sections until you get things just right.
If you're playing an instrument, you can slow the music down with the D-pad for especially tricky parts. If you're singing, you can toggle on a guide pitch with , or focus on a specific harmony part with . (When focusing on a specific harmony part, the other parts don't contribute to your score.)
If you have a guitar controller plugged in, you can go to Training → Endless Solo Mode on the Main Menu. Here, you can choose any song in your library and invent your own solo throughout the song!
Customer Support
For support with your Rock Band 4 controllers and microphones, Rock Band 4 discs, or any other physical products, please consult the support information included with your physical products.
For support with the Rock Band 4 software only, go to http://support.rockband.com for FAQs, troubleshooting tips and more.
End User License Agreement
Opening the Rock Band 4 game box, downloading Rock Band 4 and/or otherwise using the Rock Band 4 software constitutes acceptance of the End User License Agreement available at http://rockband.com/license.
Other
All FENDER, SQUIER and JACKSON guitars and basses, FENDER and SWR amplifiers, logos, trade dress, and product configuration, including the distinctive guitar and bass headstock and body designs, contained in this game are the trademarks of Fender Musical Instruments Corporation and used herein under license.
All GRETSCH guitars and basses, logos, trade dress and product configuration, contained in this game are the trademarks of Fred W. Gretsch Enterprises, Ltd. and used herein under license. All rights reserved.
Online, network, connected and/or Internet play, functionality, features and support for Rock Band 4 and any and all other products or services of Harmonix Music Systems, Inc. and any third parties (collectively, "Online Services") are provided solely on an "as is" and "as available" basis and may be modified or discontinued without notice at any time and at the sole discretion of the parties, without any legal, financial or other liability whatsoever. No warranty, either express or implied, is made regarding the Online Services and under no circumstances shall any refunds, rebates or other sums be owed and/or returned in connection with the modification or discontinuation of the Online Services.
To the extent that Harmonix Music Systems, Inc. or any end user of Rock Band 4 makes audio edits to the licensed music content incorporated herein, neither Harmonix Music Systems, Inc. nor such end user shall obtain any ownership or interest in the audio portion of any such derivative works of such licensed music content, and as between Harmonix Music Systems, Inc., such end user and the licensor of such music content, the licensor shall retain sole ownership in any audio portion of such derivative works. The foregoing shall not apply to Harmonix Music Systems, Inc.'s graphical or gameplay elements, or any non-audio elements added to any licensed music content (the ownership of which shall remain with Harmonix Music Systems, Inc.
®2015-2016 Harmonix Music Systems, Inc. All rights reserved. Harmonix, Rock Band and all related titles and logos are trademarks of Harmonix Music Systems, Inc. Rock Band™ 4 and Rock Band Rivals developed by Harmonix Music Systems, Inc. All other marks are the property of their respective owners. This product is covered by Patents identified at www.harmonixmusic.com/patents.
3.0