This mode is recommended for players new to Dead Rising. Story mode includes generous auto-saves and enough time to complete both the Main Story and all the Side Missions.
Leveling up is very important in Dead Rising. It's not unheard of to find yourself stopped in your tracks by a tough battle and unable to progress much further if you try to power straight through the game. You can use the 'Chapter Select' and 'Restart Chapter' options to reset the timeline to any completed chapter while keeping your character progress. This will help you to level up more quickly and progress more smoothly. If that's not enough, you can always ask a friend to join your game and help you in Online Mode.
If you feel daring or want to relive the experience from previous Dead Rising games, try Nightmare Mode for a more brutal and frantic experience.
In this mode, the story is the same but enemies are tougher. There are no auto-saves and you will be racing the clock as well as fighting zombies. If you are able to complete this mode, a special reward will be waiting for you. This mode is recommended for experienced players or veteran Dead Rising fans. The differences between Story Mode and Nightmare Mode include the following:
- More resilient zombies
- More damaging enemies
- Much less time to complete the game
- Your time remaining is always displayed on screen
- When the bomb drops, it's Game Over
- No auto-save
- No chapter select
- You can only save in restrooms
- The supply of items in Weapon Lockers is cut in half
- You receive a special reward for completing this mode
Select this option to join an online game session in progress. You can join both Story Mode and Nightmare Mode games without restrictions. When joining another game session, you will play as Dick, a different character, but you will keep your current level and attributes.
There are several different ways to save your progress. When playing Story Mode you have access to the full range of save options:
- Manual Save
- Checkpoint Save
- Portable Toilets or Restrooms
In Nightmare mode, you can only use Portable Toilets or Restrooms to record your progress. There is no auto-save in Nightmare Mode.
Manual Save
From the Pause Menu choose Save Game to save your progress. This save option is not available in Nightmare Mode.
Checkpoint Save
The game automatically saves progress at key moments in the game. This save option is not available in Nightmare Mode.
Portable Toilets or Restrooms
Saving in Nightmare Mode requires the player to find and use Portable Toilets or Restrooms to save current progress. Safe zones always have a Portable Toilet or Restroom. Discover additional Portable Toilets or Restrooms around the world to increase your possible save locations.
Save Structure
Dead Rising 3 saves player data and game progression data separately. This process lets you to enjoy all the game modes using the same character you've been fine-tuning as you play the game. Player data includes things like Player Level, PP Earned and which Items and Skills you've unlocked. This data is applied regardless of the mode you choose to play.
Game progression data includes things like what missions you have cleared, how much time has passed in the timeline and the state of the world. This information is saved separately for Story Mode and Nightmare Mode so you can start a new Nightmare Mode game without disturbing your Story Mode progress.
When playing online, game progression and character data is saved while playing as Nick. While playing as Dick, character data and unlocked Chapters are saved. Any collectibles you unlock or levels you gain while playing online will remain unlocked for your single player game.
The story so far
The world’s first reported zombie outbreak happened in the American city of Willamette, Colorado, causing thousands of casualties and changing American lives forever. Photojournalist Frank West, eager to make his mark, helicoptered past military barricades eager to find out the untold story of how zombies came to Willamette. Through persistence and guts, he discovered that the outbreak was an act of vengeful terrorism. Carlito Keyes and his sister Isabela had travelled from their small tropical village of Santa Cabeza to unleash the rare, exotic parasite that creates zombies – straight into the heart of America. But Frank sensed things might not be so clear-cut. He hunted down Isabela, took her captive and eventually discovered the terrible need for revenge at the heart of Carlito’s desperate act.
Several years later, a major outbreak in Las Vegas spurred the development of a drug to resist the parasite. Zombrex, an anti-zombification drug, was created by the giant pharmaceutical corporation, Phenotrans. Phenotrans sells Zombrex at a high cost, but it’s the only way to keep the infected alive. Chuck Greene, former Motocross champion, is so desperate to keep his infected daughter, Katie, out of harm’s way that he agrees to appear on the controversial zombie game show, Terror Is Reality, in America’s new adult playground, Fortune City. Terror Is Reality pits real zombie outbreak survivors against an army of the undead. But something goes terribly wrong and the show’s zombies are released in the resort. Fortune City is sealed off and Chuck is framed for starting the outbreak. But Chuck manages to escape captivity long enough to discover who really started the outbreak – and the grotesque reason why.
Now, it’s been over a decade since the infamous zombie outbreak at Fortune City, and the world has changed. The parasite that causes zombification can be controlled by regular doses of Zombrex, and the government has stepped in to make sure it is. All infected people must register with the government, and must be tracked by GPS chips. A widespread network of cameras and microphones helps to ensure everyone’s safety – and obedience. But despite the precautions, the unthinkable happens – again. This time in one of California’s most populated cities, Los Perdidos. Nick Ramos, a young mechanic with a mysterious past, must find a way to get out of the city. But the military and the government seem incapable – or unwilling – to evacuate. Nick must join up with a motley band of fellow survivors to escape the city or die in the biological cleanse coming in a matter of days.
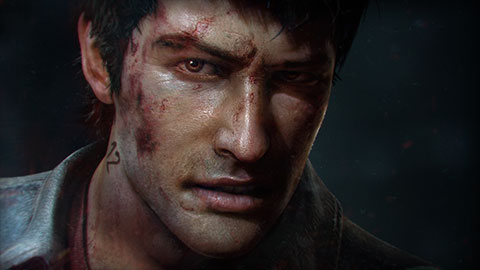
Nick Ramos
Nick spent much of his early life in foster homes and knows nothing of his origins – not his family, name or even what country. Nick ran away from a foster home at age fourteen and made a lonely existence for himself. He's grown up to be self-sufficient, good-humored and very skilled auto mechanic, but he’s still a bit of a sentimentalist and continues to search for some sense of family wherever he goes. He’s unsure of himself when faced with a zombie apocalypse, but slowly, he discovers a confidence he never dreamed he had.
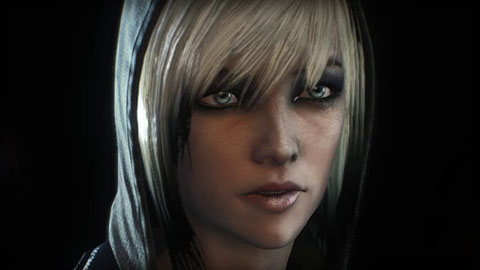
Annie
After running away from home as a teen, Annie quickly found networks of other runaways and soon hooked up with the underground unregistered infected people - the “illegals” - dedicated to living outside government scrutiny. She engages in minor criminal activity like petty theft, but all in the name of helping her fellow illegals. She still has sparks with Red, her ex-boyfriend and charismatic leader of the illegals, much to the dismay of Nick. Annie is tough, self-sufficient and keeps her vulnerable emotional core hidden deep inside.
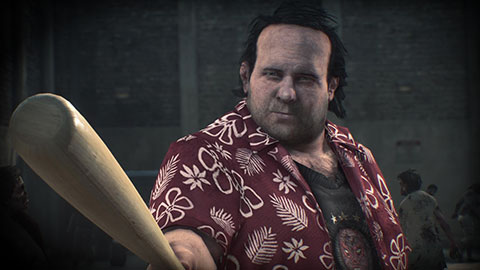
Gary
Gary is a washed-up, pot-bellied ex-wrestler with an alcohol problem. He works as muscle for a powerful criminal gang lord, who is still out to make a killing in the outbreak-ridden city. Gary's a tough guy who’d prefer to take the easy way out in most cases and can be a little melancholy from time to time. The outbreak is making Gary rethink his priorities, and filling him with regrets for paths not taken.
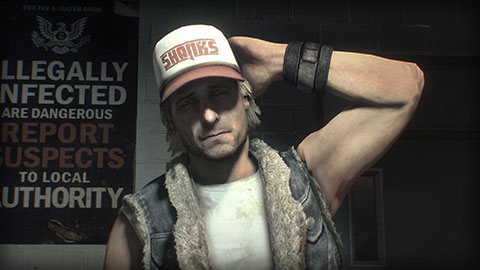
Dick
Dick is a big rig truck driver who survives the initial outbreak along with Nick, Annie and Rhonda. Dick had been pulling his rig through town when he stopped at the wrong diner on the wrong highway on the wrong day. Dick can be cynical and snarky and lives up to his name for the most part, but is also loyal and brave and wants to do the right thing.

Rhonda
Rhonda is the owner of a series of body shops. A master mechanic in her own right and Nick’s longtime boss. She’s tough as nails, but is still the kind of woman who calls everyone “honey” and “sugar”. She’s a motherly figure for Nick as he never had a family of his own. She’s determined to do whatever it takes to get out of town alive.
Red
Red presides over a shifty underground network of illegally unregistered infected, criminals and rebels. He sees himself as a resistance fighter and an activist against the government's repression of the infected. He’s also looking for a way to get his people out of town before the city is destroyed. Red is fearless, strong, warm and loyal to his family and suspicious of strangers. He is also Annie’s ex-boyfriend and may still carry a strong torch for her.
There are many different things to do in the city of Los Perdidos. Activities are split up between Chapters, Side Missions, Psycho Missions, Stranded Survivors, Survival Training and Xbox SmartGlass Companion Missions. Performing these activities will earn you various rewards.
Chapters are the main missions in the game. Your Chapter objective will be displayed on the bottom left corner of the screen, under the mini-map. Completing these objectives will advance the story and will help Nick unravel the mysteries behind the outbreak.
Time Limit
Dead Rising 3 is unique because you only have a limited amount of time to complete the story. Nick must find a way out of the city within six days when time runs out and the military bombs the city. In Story Mode there is plenty of time to complete the Main and Side Missions, but in Nightmare Mode you will be in a constant battle against the clock. The amount of game time remaining before the city is destroyed is displayed on the Map & Missions screen in the Survival Guide.
Multiple Endings
The story can play out in many different ways. You will receive a different ending depending on your actions during the game. You will receive the best ending in the game by completing key objectives and making the right choices.
Game Fail States and "The Truth has Vanished"
If certain characters critical to the story die, or if items you must have to be able to progress in the story are destroyed, it will be impossible to discover the truth about what happened in Los Perdidos and you will no longer be able to complete the story, but that doesn't mean the game is over right then and there. You will receive a message letting you know that "The Truth has Vanished", and at this point you can choose to restart the previous chapter, or you can keep playing to continue to gain PP, level up your character and explore Los Perdidos until the time remaining in the story runs out.
Optional side missions become available as you play through the game. These missions must be completed within a certain amount of time or they will expire. The amount of time remaining to complete any mission is represented by the colored bar below the mission's name.
Some survivors Nick encounters will need his help in a variety of ways. Nick can complete their Side Missions, which is a great source of PP and other rewards. Some of these survivors may even join Nick's posse. Your available Side Mission objectives are displayed above the mini-map.
The following types of Side Missions are available:
- Survivor Missions
- Psycho Missions
- Stranded Survivors
- Survival Training
- Xbox SmartGlass Companion Missions
Survivor Missions
Nick will meet many survivors stranded in Los Perdidos. If he decides to help solve their problems by completing their side missions, he will recieve various rewards and the survivor may become available at the Survivor Bulletin Board for Nick to call on later. Survivor Missions are the most common type of side mission you will encounter.
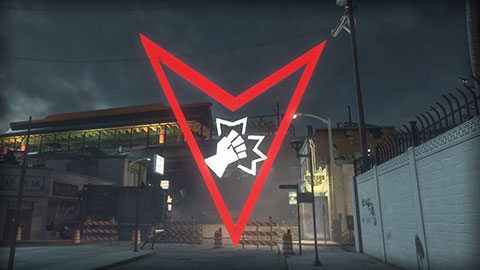
Psycho Missions
Certain people just can't take the pressure of a zombie outbreak. Survivors in a Psycho Mission are unstable people. Always be prepared and stock up with weapons and food before starting a Psycho Mission as you never know what kind of encounter you're in for. Your available Psycho Mission objectives display above the mini-map with your Side Missions.
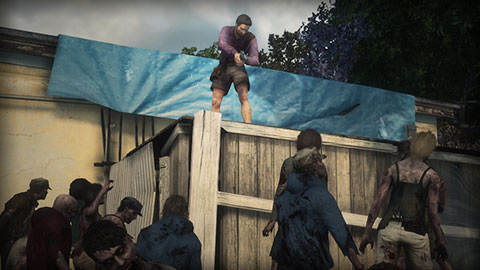
Stranded Survivors
Stranded Survivors are people who are just trying to get to safe place and get out of the horde. Help out Stranded Survivors by clearing out most of the zombies around them. This will give them a large enough window to escape and gives Nick a quick source of PP. Be warned though, Stranded Survivors are in peril. If you just walk away once you encounter them, they will likely meet their doom.
Survival Training
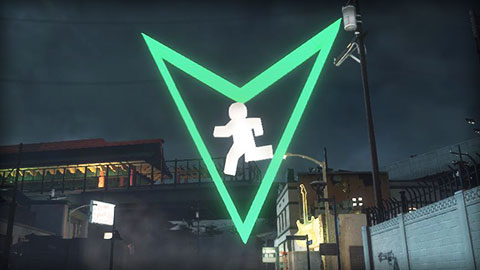
Think you got what it takes to survive in a full-scale zombie outbreak? Prove it! Behind every green pillar of light is a Survival Training mission. These will challenge Nick to kill as many zombies as he can, within a time limit, using a variety of different methods. Earning bronze, silver, or gold medals in a Survival Training mission will earn Nick huge amounts of PP.
Xbox SmartGlass Companion Missions
After finding the ZDC Agent's phone, if you have downloaded Xbox SmartGlass to your smartphone or tablet and have Xbox SmartGlass Companion enabled, you'll start to receive Companion Missions from Jamie. These missions are exclusive to Xbox SmartGlass, and give Nick access to codes to use for his military applications and PP. They'll also uncover more of the story going on in the city, including Jamie's backstory.
Look for stranded survivors to save. Help them by clearing out enough of the nearby zombies so they can escape to safety. Saving them will help gain you extra PP.
In Dead Rising 3, you can create a 'posse' of survivors to help you through the world. You control them by issuing commands to use your posse to your advantage.
Survivor Commands
Command survivors by pressing the d-pad or using voice commands. With Kinect you can use voice commands and point at the screen with your right hand to order your posse exactly where they should perform their command. Without pointing you can command your posse to “Scavenge”, “Attack” or “Follow me”.
Go There
"Go there" command allows you to command your posse to move to a desired position. Once at that location they will defend themselves around the area and remain there until told otherwise.
Follow Me
"Follow me" will notify your posse to return and then follow you.
Traveling in a vehicle will automatically command your posse members to follow you.
Attack
"Attack" will allow your posse to increase their targeting range and attack zombies around themselves or any location you may have specified.
Scavenge
"Scavenge" will command your survivors to search the area for items. They will attempt to search for weapons as their main priority but if they're badly injured they will search for food. If they're already carrying a weapon they will look for a better weapon to replace it with.
If you command your posse to stay at a location and then leave that location yourself the survivors will be sent back to the Safe Zone so don't stray too far away from them.
Gangs of the unregistered infected have created several Safe Zones throughout Los Perdidos to hide from zombies and the ZDC. These zones are marked in your map and you can break into them to access lockers for weapons and clothing.
Some of the zones have been breached by the zombies and need to be cleared out before they can be used. In other cases, their entrance doors will be locked and cannot be accessed until you find the correct key. The map icons will indicate the status of Safe Zones.
Zombie-Infested Safe Zone
 Cleared Safe Zone

Cleared Safe Zone
Every Safe Zone has its own Survivor Bulletin Board. Some of the Survivors you save or help out will appear here, ready to be recruited. If you need some help, form a posse and head out for some group zombie slaying. Check the survivor stats to pick up the ones which better match your play style.
Like Bulletin Boards and Clothing Closets, Weapon Lockers can be found in every Safe Zone. Every weapon you pick up will appear here in its corresponding category page. You can take out as many weapons from the locker as you like, until its supply depletes.
The current supply of the Weapons Locker is indicated by the bars at the bottom of the locker screen. When the bars deplete, you won't be able to pick up more weapons from the locker. These bars slowly recharge over time. The recharge rate is also slower in Nightmare Mode.

Clothing Closets can be found in every Safe Zone. All the pieces of clothing you find in Los Perdidos will be kept here, ready for you to wear. The clothes don't have to be worn in complete sets so make sure you try different tops and bottoms to create your own personal style!
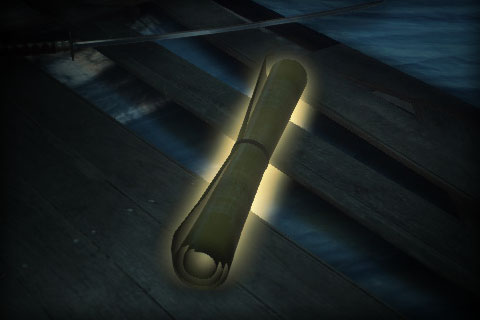
The city of Los Perdidos is filled with unique collectible items you can discover to gain extra PP or unlock weapon and vehicle combos. These items can only be collected once and are not lost if you die after collecting them.
The Map and Mini-map will show collectable items in your vicinity. Find all the ones from one type to complete PP Trials and gain PP rewards.
The following collectibles are available:
Blueprints unlock new Weapon and Vehicle combinations to craft. Vehicle and Weapon Combo Blueprints are blue and Super Combo Blueprints are gold. The Super Combo Weapons are so powerful they have to be built in multiple stages and you will have to find all the Blueprints of the component parts before you build the ultimate version.

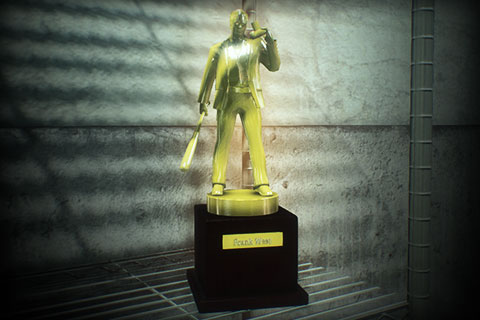
Nobody argues that Frank West is a hero; after all, he's covered wars and uncovered conspiracies, you know. Since he is such an icon it makes sense he would be celebrated with a line of Commemorative Statues. Pick up Frank statues around the city and you will be rewarded with a nice PP bonus. The more you collect the larger the PP bonus becomes. Collect all 70!

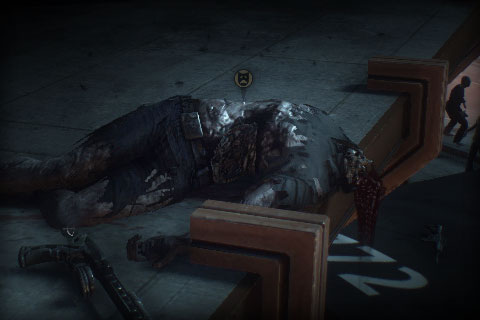
Not everyone has been turned into a zombie; some of the Los Perdidos locals died in brutal but bleakly funny ways. When you discover these so-called 'Tragic Endings' you'll receive a PP bonus. The more you discover the more PP you'll receive as a bonus. There are 30 to find.

The Federal Bureau of Zombie Defense and Control has installed propaganda speakers around the city. If you have a ranged weapon and stumble across one of these, shoot and destroy them for an increasing PP bonus.


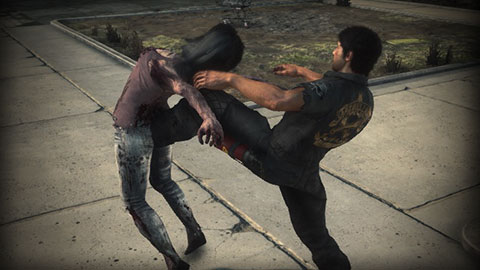
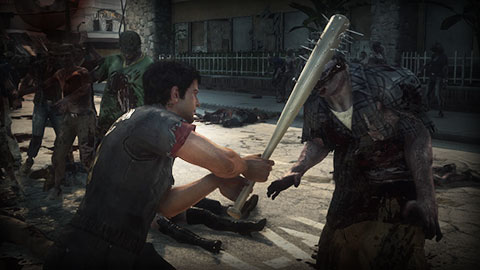
Light Attack
Press to use the Light Attack when you need to attack quickly and with a lot of fast attacks. These attacks don't do a lot of damage but are great for fighting off zombies.
Heavy Attack
Press to use Heavy Attacks. These are slower but inflict much more damage than Light Attacks. When you encounter an especially tough zombie and those Light Attacks aren't cutting it, use a Heavy Attack to knock them backwards. These attacks generally do wide sweeping arcs and can hit many zombies with one blow. With great damage comes greater risk as there is a higher chance of the attack being interrupted and weapons will wear out faster.
Chaining Attacks
You can chain Light and Heavy Attacks together to perform combos. The more attacks you perform the greater the combo becomes. You can even switch between Light and Heavy Attacks mid attack chain.
Ground Attack
Hold down to stomp on the ground. This is great for taking out those pesky zombies gnawing at your ankles.
Grapple Attack
Hold + to perform a Grapple Attack. These allow you to grab hold of a zombie and perform more advanced attacks.
Pick Up Items
Zombies are slow moving so use your mobility to your advantage. You don't need to stop to pick up items in Dead Rising 3 so try picking items up when you're in motion. You can even pick up items coming out of a Dodge Roll.
Quick Throw / Shoot from the hip
Nick is really good at shooting guns and throwing from the hip! Tap without going into Aim Mode to quickly throw whatever is in your hand at the nearest enemy or shoot your gun at them without breaking combat flow.
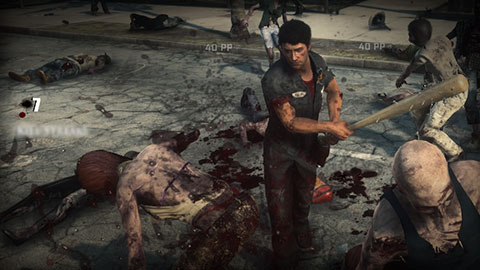
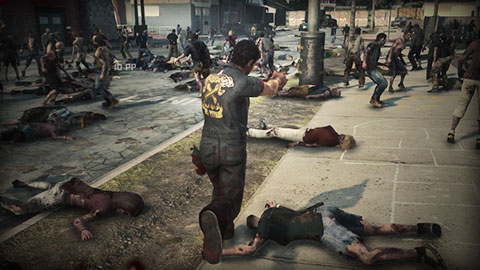
Kill Counter
When you kill five or more zombies in a short period of time, a Kill Counter appears on screen. If the gap between kills gets too big the kill counter will expire. The higher the final kill count, the higher PP you'll get for every zombie kill.
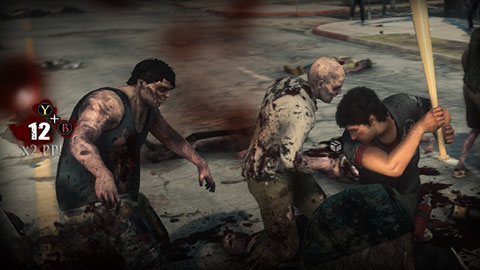
Skill Moves
Pressing + allows you to grapple an enemy. By default you will kick zombies away when you grab them. Using more advanced Skill Moves requires building up a Kill Counter. When the counter is 10 or higher, you have access to Skill Moves and a + grapple prompt will appear on screen. Use the Grapple Attack to instantly kill a zombie. As you gain a greater player level you will gain access to better and stronger Skill Moves.
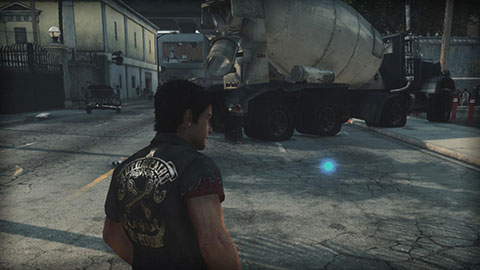
Zombies
The horde of flesh-hungry zombies will be Nick's main adversary as he desperately searches for a way out of the city. They can see and hear Nick and are able to alert other zombies around to quickly overwhelm him. You need to work hard to avoid being surrounded if you want a better chance of surviving.
Zombies are slow and stupid but are very aware of their surroundings. If Nick makes too much noise or uses loud weapons, the zombies will be attracted to him. Sometimes you can use this to your advantage by attracting the zombies towards you using Kinect Voice Controls. You can also use certain weapons to distract zombies e.g shooting a flare gun to make the horde follow the pretty lights or by throwing a hunk of meat to watch the zombies scramble for a bite. Here are a few weapons you can use to manipulate zombies in different ways:
- Flare Gun
- Firecrackers
- Portable Stereo
- Hunk of Meat
- Rocket Fireworks
Marquee Zombies
Nick will encounter unique zombies that have retained some latent memory of their past. They are usually tougher and may carry items to fight Nick. A hit and run method works best against these zombies as they can take more hits than the normal zombie horde.
- Firefighter - Immune to various elements due to their protective suit, they usually carry their fire axes which they use to swing at Nick.
- Policeman - Policeman zombies carry either a handgun or a shotgun which they fire at random.
- Prisoner - These big prisoner zombies attack Nick with their sheer brute strength and heavy melee attacks.
- Football Player - Watch out for their football tackles. These zombies often come out of nowhere and take you down to the ground.
- Special Ops - They carry assault rifles which they fire at random and are heavily armored.
King Zombies
As he gets deeper into the story Nick will encounter these grotesque creatures. The wasps which carry the zombie parasite have created a hive within the King Zombie's body. They are constantly swarming, attacking anything near the host, making King Zombies extremely deadly. Be careful after you've 'killed' a King Zombie as they pack a punch when they go through their death throes. They're a very tricky customer indeed.
Gang Members
These outlaws are making the most of the zombie outbreak and have turned it to their own mercenary advantage by taking over various areas of the city. They are tougher than zombies as they utilize in both close and distant combat. Fighting them from afar is the best way to deal with the Gang Members as they will tend to swarm you if you get within melee range. If you do risk going close then heavy attacks and combo weapons are very effective against them.
Special Ops
These heavily-armed soldiers have been sent into the city to eliminate or capture high value targets. They can harass you from a far with their assault rifles, RPGs or grenades so take them out as soon as you can before they overwhelm you. As with the gang members, using heavy attacks and combo weapons can be very effective against them.
Psychopaths
During the game you will meet some sick individuals who have succumbed to their utmost desires and obsessions, driving them to acts that are beyond human morals. Each one provides unique challenges Nick will need to overcome but the effort will be worth it as they always provide great rewards as well.
Bosses
Nick will encounter even bigger threats as he uncovers the truth about his mysterious past. Bosses will represent key moments of the story which always offer tough challenges. During each boss fight there are icons displayed which give hints about how to beat the boss. The target icon indicates a weak point on the boss and the hand icon indicates an important item to use against the boss.
There is a huge variety of weapons in Los Perdidos. Some are extremely useful while others might be just useful enough to get you out of a tight spot. Each weapon fits into a combo category which can be unlocked though leveling up your player. Unlocking these categories is key to using some of the most powerful weapons in the game. Once you have the right blueprints and combo categories unlocked you will have some incredibly powerful weapons at your disposal.
Weapon Categories
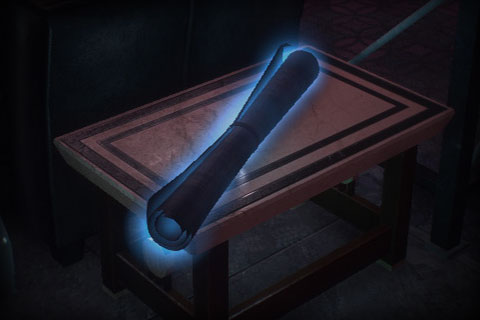
 Axe
Axe
Axe weapons are objects with a handle and a sharp bladed head on the end. Some examples are a fire axe or a hatchet.
 Blade
Blade
Blade weapons are sharp objects which excel at slicing zombies. Some examples are a broadsword or a chef knife.
 Blunt
Blunt
Blunt weapons are objects with dull edges and are good for smashing in a zombie’s head. Some examples are a baseball bat or a large wrench.
 Bow
Bow
Bow weapons shoot deadly projectiles, a great way to take out zombies from a distance. Some examples are a crossbow and a harpoon gun.
 Chemical
Chemical weapons are objects with dangerous fluids. Some examples are motor oil or a beaker of chemicals.
 Electronic
Electronic weapons are generally household objects you’d find plugged into an electric socket. Some examples are an LCD monitor or a game console.
 Explosive
Explosive weapons are objects that can decimate a large area. Some examples are a grenade or a stick of dynamite.
 Firearm
Firearms are guns that fire a deadly projectile. They're a great way to kill zombies but they are loud. Some examples are a hand gun or a shotgun.
 Gloves
Glove weapons are objects you wear on your hands. Some examples include boxing gloves or MMA gloves.
 Helmets
Helmet weapons are objects you can slam onto a zombie's head, disorienting them. Some examples are a Servbot Mask or a bucket.
 Mechanical
Mechanical weapons are objects which are motorized or gas powered. Some examples are a chainsaw or a leaf blower.
 Misc
Misc
Misc weapons are a random assortment of objects which don’t fit into other categories. Some examples are a cardboard box or a handbag.
 Novelty
Novelty weapons are objects like a kid’s toy. Some examples are a toy robot or a pogo stick.
 Polearm
Polearm weapons are long pole-like objects; great for thrusting into a zombie’s gut. Some examples are a spear or a broom.
 Pushable
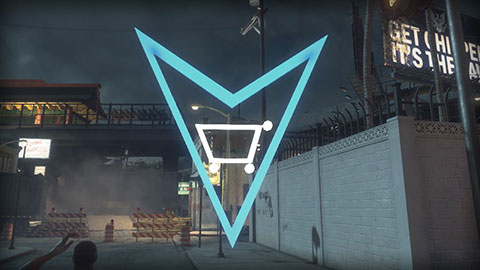
Pushable weapons are objects on wheels you can push around to knock over zombies. Some examples are a shopping cart or a lawn mower.
 Thrown
Thrown weapons are objects which are effective from a distance. Some examples are a football or a stack of plates.
Combo weapons are a combintation of two different weapons. They are more powerful and durable than the sum of their individual parts. In order to build combo weapons, the relevant blueprints must first be obtained. Blueprints can be found throughout Los Perdidos.
List of Combo Weapons
- Acid Jar – A jar filled with a deadly explosive chemical
- Acid Rain – A flare gun that rains acid down on the zombies
- Acid Toy – An acid filled doll of a baby
- Beer Hat – A keg mounted on a construction helmet
- Blambow – A crossbow that shoots explosive arrows
- Boom Cannon – A homemade grenade launcher
- Boomer Axe – A deadly throwing axe
- Car Bomb – An explosive remote control car
- Chest Beam – A makeshift weapon that shoots an energy beam
- Chop N Talk – A talking axe
- Chopper – A deadly homemade axe
- Defiler – A heavy hitting blunt weapon
- Dragon Punch – Wind powered gloves
- Dynameat – A humans hand wrapped in explosives that attracts zombies
- Electric Chair – A wheel chair with electricity surging through it
- Flame Arrows – A crossbow that shoots fire arrows
- Flamethrower – A homemade firearm that shoots a stream of flames
- Flaming Gloves – Boxing gloves covered in flames
- Flaming Helmet – A dragon mask that shoots fire from its mouth
- Flaming Sword – A sword covered in flames
- Gloves Gun – A novelty foam finger attached to a spring
- Hail Mary – A football covered in grenades
- Heavy Metal – A large makeshift blunt object
- Helmet Bomb – A giant bomb you put on a zombies head
- IED – A propane tank with spikes jammed into it
- Iron Edge – A deadly homemade sword
- Jack in the Box – A bladed robot with an explosive ending
- Jazz Hands – Gloves with guns for fingers
- Junk Ball – A mish-mash of objects to create a deadly ball of junk
- Knife Gloves – Blades attached to boxing gloves
- Laser Sword – A deadly sword with a laser blade
- Mauler – Two blades attached to the end of a pole
- Metal Mary – A football made of spikes and metal
- Mini Chainsaw – Two one-handed deadly chainsaws
- Napalm Bomb – A deadly fire explosive
- Party Gloves – Silly boxing gloves that can send zombies flying
- Pole Weapon – A deadly homemade spear
- Pukes O Hazard – A firearm that shoots a stream of acid
- Pummel Blast – A sledgehammer with explosives on the head
- Remote Detonator – A remote controlled explosive
- Roaring Thunder – An electrified helmet that sends out an electric shockwave
- Rocket Punch – Gloves that shoot out metal rockets
- Sabre Shot – A shotgun with a sword attached to it
- Sentry Cat – A robot cat that hates zombies
- Shocking Touch – Gloves that zaps zombies and shoots electricity
- Sledge Saw – The gory combination of a blunt and slicing weapon
- Spiked Bat – Nails on a bat creating a deadly combination
- Spiked Bucket – Sharp shards sticking into the bucket; deadly when placed on a zombie's head
- Split Shot – An assault rifle with multiple barrels
- Super Crossbow – A crossbow that shoots multiple arrows
- Super Massager – A powerful firearm that shoots massagers
- Tenderizer – MMA gloves with nails and metal attached to them
- The Slapper – Large poles with oversized hands on the end
- Weapon Cart – A shopping cart tricked out to slice and dice zombies
- ZAR – A deadly firearm that has multiple fire modes
- Zombie Raker – A leaf rake with blades on the end
Super Combo weapons are the most deadly weapons in the game. They start as a combo weapon but can be upgraded into much more powerful versions. Keep upgrading them to get to the ultimate, most-devastating version.
Like combo weapons there are super combo weapon blueprints to be found in the world. You need to collect the blueprint before you can build the weapon.
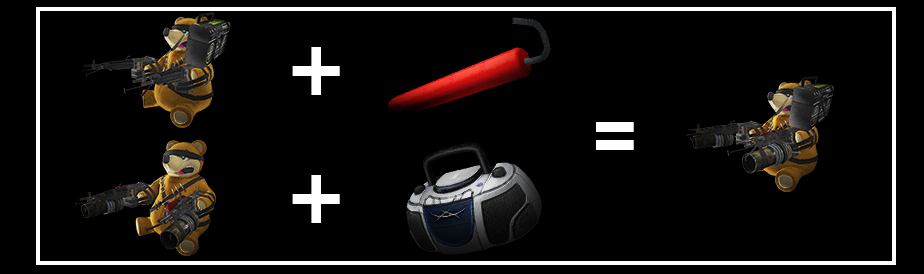
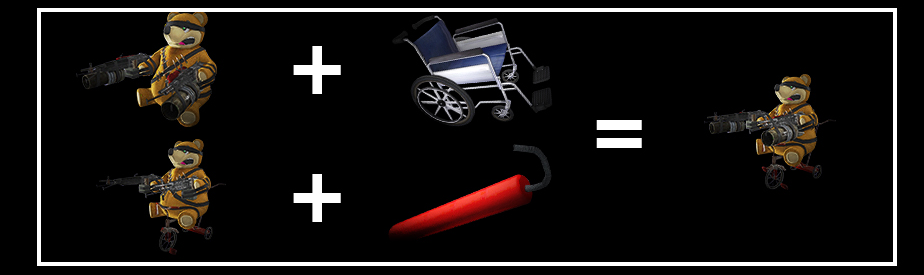
Freedom Bear

The Freedom Bear is the first version of this deadly super combo weapon. It’s a large toy teddy bear sporting two large guns. To make the first version combine the robot bear with a LMG.
Cuddly Bear

Add a portable stereo to add a lure to the Freedom Bear.
Pushy Bear

Add a wheelchair to give the Freedom Bear some wheels.
Boom Bear

Add some dynamite to give the Freedom Bear a grenade launcher.
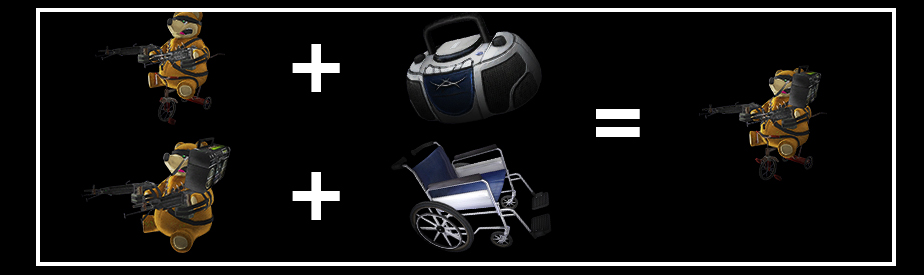
Provoked Bear
Add dynamite to the Cuddly Bear or add a portable stereo to the Boom Bear. This version will have a lure and shoot grenades.
Volatile Bear
Add a wheelchair to the Boom Bear or add dynamite to the Pushy Bear. This version will have wheels and shoot grenades.
Decoy Bear
Add a portable stereo to the Pushy Bear or add a wheelchair to Cuddly Bear. This version will have a lure and wheels.
Grisly Bear
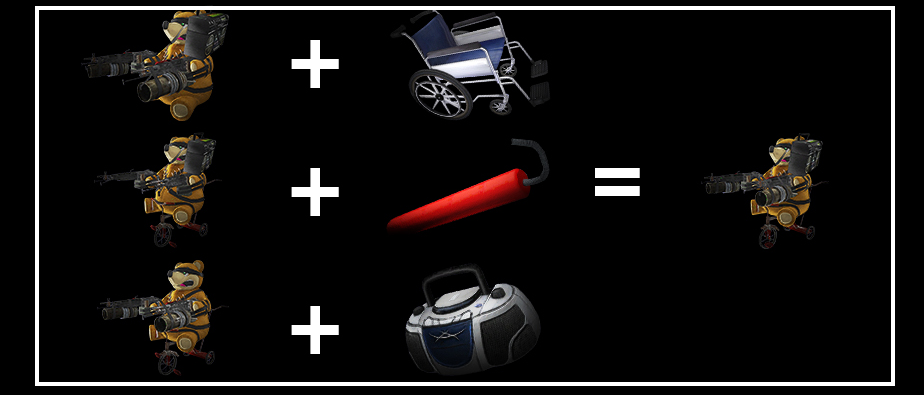
Add dynamite to the Decoy Bear or add a portable stereo to Volatile Bear or add a wheel chair to Provoked Bear. This is the ultimate version and will be able to shoot grenades, lure zombies and have wheels.
Big Bomb

Big Bomb is the largest most devastating explosive in the game. With the super combo weapon patience is a virtue. You’ll want to build it into its ultimate version to do the most damage. Big Bomb starts with a RPG and a propane tank.
Bigger Bomb

Add a grenade to the Big Bomb to make it more devastating.
Huge Bomb

Add a Gasoline Canister to the Bigger Bomb make it even deadlier.
Enormous Bomb

Add a microwave to the Huge Bomb to get this thing close to atomic.
Massive Bomb

Add a laptop to get the Massive Bomb This is a bomb of massive destruction.
Buffet Cart

The Buffet cart is a portable food dispenser. As you upgrade it the type of food you receive will offer greater healing strength. The first version is made by combining Ham with a drink cart.
Drink Buffet Cart

Add large soda to the Buffet Cart to get a better version.
Meat Buffet Cart

Add lettuce to the Buffet Cart to get better version.
Ultimate Buffet Cart
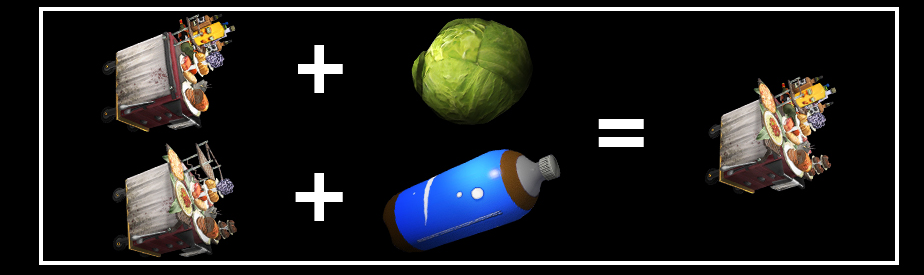
Add lettuce to the Drink Buffet cart or add a large soda to the Meat Buffet Cart to get the ultimate version.
Electric Staff

The electric staff is a weapon that makes you feel like a wizard and allows you to command the powers of the elements. The more you upgrade the more elements you can controls. The first version is made by combining a traffic light with a battery.
Press to perform a power area of effect attack and to switch between elements.
Electrofire Staff

Add a propane tank to the Electric Staff. This version will now have electric and fire attacks.
Electroice Staff

Add liquid nitrogen to the Electric Staff. This version will now have electric and ice attacks.
Elemental Staff

Add a propane tank to the Electroice Staff or add liquid nitrogen to the Electrofire Staff to get the Elemental Staff. This ultimate version allows you to use electric, fire and ice attacks.
Grim Reaper

This weapon will make you feel like Death himself as you wield a massive and deadly scythe. Combine a scythe and a katana sword to make the first version.
Death Mask Reaper

Add a reaper mask to the Grim Reaper. This version will now shoot skulls from the heavy attack.
Fire Reaper

Add a gasoline canister to the Grim Reaper. This version will now make it a flaming scythe.
Ultimate Grim Reaper
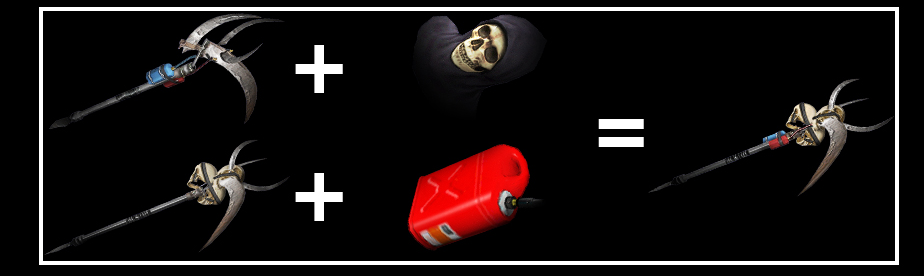
Add a reaper mask to the Fire Reaper or add a gasoline canister to the Death Mask Reaper. The ultimate version is a flaming scythe that shoots flaming skulls on the heavy attack. It also has a special ability where the ammo of the flaming skulls recharges when you kill zombies with it.
Mecha Dragon

This weapon will turn you into a human dragon. The first version is made by combining a dragon head with a parasol.
Mecha Dragon Blade

Add a katana sword to the Mecha Dragon. This version will give the dragon claws, unlocking new slicing attacks.
Flame Mecha Dragon

Add firecrackers to the Mecha Dragon. This version will give the dragon the ability to breathe fire.
Ultimate Mecha Dragon

Add firecrackers to the Mecha Dragon Blade or add a katana sword to the Flame Mecha Dragon. This ultimate version gives you the slashing claws and the fire breath.
Power Shout

This weapon amplifies your shout creating a huge shockwave that destroys anything in its path. The first version is made by combining a pylon and a speaker.
Electric Shout

Add a battery to the Power Shout. This version now has a static charge coursing through the shockwave.
Super Shout

Add a portable stereo to the Power Shout. This version is a more amplified version of the Power Shout.
Ultimate Shout
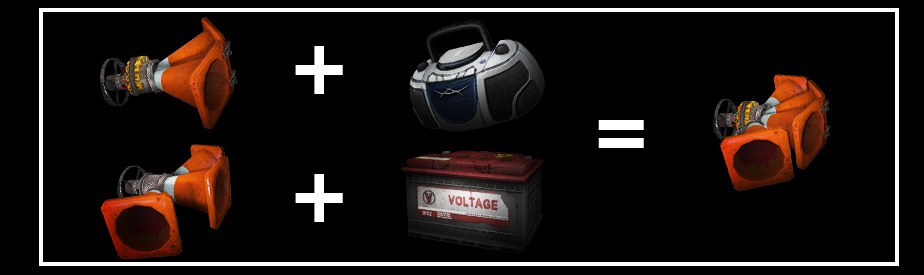
Add a battery to the Super Shout or add a portable stereo to the Electric Shout. This ultimate version is much larger than the Power Shout and it’s coursing with electricity.
Tactical RC

This weapon allows you to take control of an RC helicopter with machetes attached to the propellers. The base version is made by combining a machete with a RC helicopter.
Tactical RC Gunner

Add an assault rifle to the Tactical RC. This version will now have a gun on its base.
Tactical RC Bomber

Add a grenade to the Tactical RC. This version will shoot explosive rockets.
Tactical UAV
Add grenades to the tactical RC gunner or add an assault rifle to the Tactical RC bomber, allowing you to fire both guns and rockets.
RC Controls
- Start Flying - Hold
- Move back and forth -
- Turn -
- Raise Altitude -
- Lower Altitude -
- Fire Gun (if available) -
- Fire rockets (if available) -
There are a variety of abandoned, drivable vehicles throughout Los Perdidos. There is a vehicle that can best suit your needs whether it is for transportation or as a weapon of mass destruction. Vehicles can also be combined to create more powerful ones.
Base Vehicle Categories
 Two Wheels
Two wheel vehicles are typically smaller, quicker and more maneuverable. However, they are not as durable and do not offer much protection. Examples include the Sports Bike and the Motorcycle.
 Four Wheel Small
These vehicles will provide you with some safety and are generally quick and more nimble but may not last as long as some of the other vehicle categories. Examples include the Sedan and the Muscle Car.
 Four Wheel Large
With these vehicles you sacrifice speed for a significant increase in durability. These vehicles often have seating for passengers so they are great for transporting your posse around the city. Examples include the Van and the Ambulance.
 Small Construction
Small construction and maintenance vehicles make up this category. While they're usually relatively small they often have interesting features and abilities which should encourage experimentation. Examples include the Forklift and the Street Cleaner.
 Large Construction
These are tough and powerful but not the fastest way to get around the city. Like small construction vehicles, you might be able to use their abilities to make your mark. Examples include the Backhoe Loader and the Steamroller.
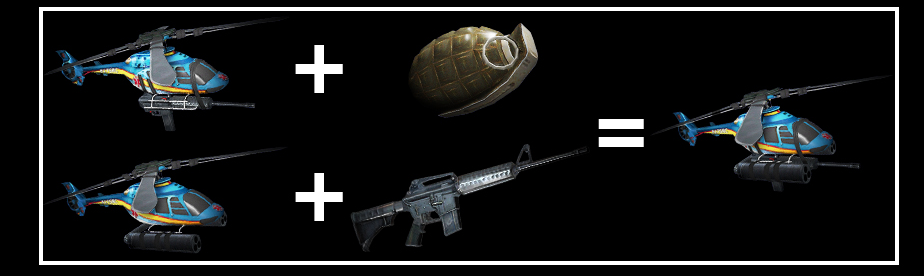
Blueprints will be earned and discovered as Nick progresses through the game. Some of these blueprints include Combo Vehicles that Nick can use to create deadly zombie killing machines. Combo Vehicles are much stronger and safer than base vehicles. They can be created in city streets or in the safety of the Wrench-o-Rama Combo Garages.
The following is a list of Combo Vehicles:
Rollerhawg
A quick and durable combo vehicle with built-in flame throwers that incinerate zombies. It also has a built-in steamroller that will obliterate zombies in the expected gruesome manner.
Mini Bike
Although slow at first, this combo vehicle has a speed boost that reveals huge blades that slice through zombies with ease.
Party Slapper
This combo vehicle has a vacuum system that sucks up zombies and inflates them into zombie balloons that bounce then explode killing any zombies in their path. It's also rigged with explosive streamer balls which help reduce the zombie population.
Shockdozer
This vehicle has extreme plowing and shocking abilities. Use the front plow to throw anything in your path out of the way or use the electrical attacks to send zombies into a state of shock.
Junk Bike
A nimble little vehicle with built-in machine guns and a self-destruct feature. Shoot zombies or detonate the vehicle and run.
Junk Car
Another vehicle that boasts the self-destruct feature. It's bigger and stronger than the Junk Bike and utilizes acid missiles instead of the more conventional machine gun. Hit a zombie with this weapon and give them a free hardcore 'chemical peel'.
Junk Truck
The final and strongest vehicle to come with a built-in self-destruct button. It's the largest of the three junk vehicles, so expect a big boom. It also shoots acetylene tanks that mow down zombies. If the zombies aren't killed in the first attack the exploding tank will ensure they don't present a danger to you anymore.
Mobile Locker
This vehicle is a weapons locker on wheels. It's very durable with plenty of room to transport your posse and carry all your weapons.
Turret Rig
This vehicle is very durable and deadly. It has a built-in shotgun on top and slicing blades that extend from both sides.
Forkwork
Slice, Impale and eject zombies high into the air. This combo vehicle has boosting abilities that shoot it forwards, collecting zombies on the forks allow you to take them along for a ride. It also shoots fireworks that lift zombies giving them a lesson in flying.
During the course of the game you will find hundreds, if not thousands, of different items to pick up and use in a variety of different ways against your enemies. At the start of the game the maximum carrying capacity is four items but this can be upgraded to a maximum of eight. Upgrading capacity is done on the Attribute Screen.

Using the Inventory
Press and hold to open the Inventory screen and use to select any item. Alternatively, you can tap to cycle through all your available items.
Some items are too big to be stored in your inventory and they will be automatically dropped if you switch to a different object. These include items like a Bench or a Metal Barricade. You can also drop any carried item by pressing .
During the first chapters you will unlock the ability to combo two items to create a new, more powerful, one.
Blueprints
To create Combo Weapons and Vehicles you must have found the Blueprints for it. The blueprint lists the specific items you need to make the combo.
However, you can buy additional Weapon Categories to increase the number of valid items which can be used. Once you've purchased the combo category this allows you to substitute similar items within the same category to create a specific Combo Weapon. For example if you are creating the Mauler you will need the Katana and the Machete. If you have purchased the Blades combo category you could swap either of these components with others from the Blades category such as a Bowie Knife.
To combine two weapons, open up the inventory by pressing and holding . Now highlight the weapon you want to use with and select it by pressing . Highlight the second item then press to create your combo.
The Inventory Screen will indicate which items in your possession can be combined based on the Blueprints you've found and Combo Categories you've purchased. When you have select an item which can be combined with something else in your inventory a prompt will appear indicating you can make a combination.
You can check a list of all the combo weapons here.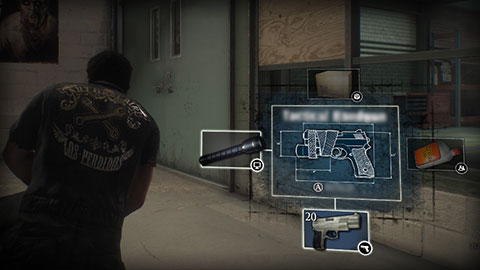
Combinations are not limited to creating new weapons. If you want real power, try combining two vehicles to create a larger one. The rules are very similar to the ones for creating Combo Weapons however you don't carry the vehicles in your inventory. To create a combo vehicle you should make sure the two vehicles are in close proximity to each other. Once they're in the correct location stand between them until they start flashing then press and hold . If you have the available Blueprint for that Combo it will appear in the lower right corner of the screen and you can proceed with the combo. Like Combo Weapons, you will need to find Blueprints first and you can also buy Vehicle Categories to make combining easier.
Check the Combo Vehicles section for more information about them.
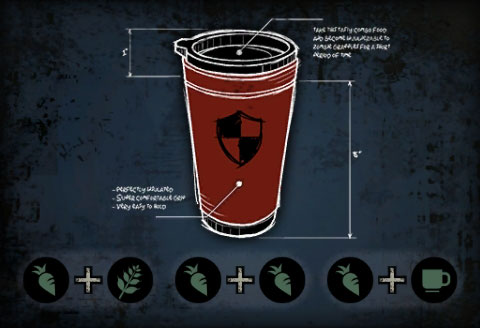
The third crafting category is Combo Food. You don't need a blueprint to create combo food however you will need to purchase the Combo Food category before you can combine any food or drink. This is purchased on the Attributes screen. Once you've purchased this category all food and drink can be combined. Combo Foods are more useful than basic food types because they offer the standard healing effect but also give out temporary benefits such as increased damage or the ability to breathe fire.
To combine foods, simply open up the inventory with and then select the two items with and .
List of Combo Foods
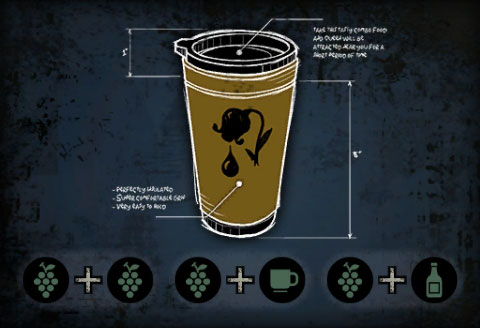
Regen

Combining drugs with meat or fruits or combining vegetables with meat and fruits will give extraordinary restorative powers. It also extends the feeling and experience of wellbeing for a short period of time.
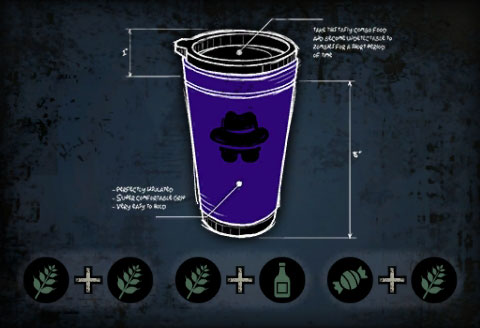
Untouchable
Zombies love meat and tests shows they're repulsed by vegetables. They will avoid grappling individuals who have consumed vegetables in combination with grains, additional vegetables or non-alcoholic beverages for a short period of time until the odor of the freshly consumed vegetables wears off.
Spitfire
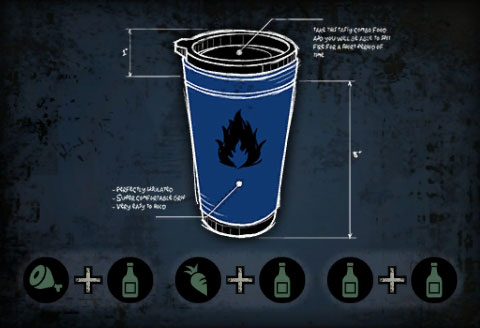
Alcohol when combined with meat, more alcohol or vegetables creates a fireball-like spit. To use this power, ensure you don't have any items equipped and then press to unleash your fiery breath.
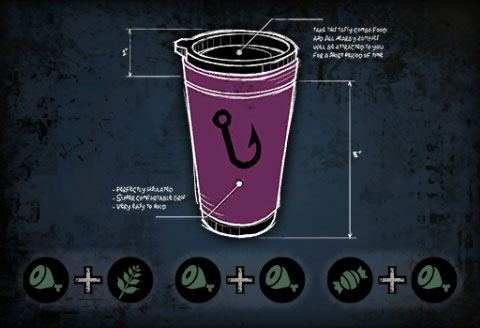
Nectar
Fruit combos can mimic the fetid odor which naturally attracts the invasive wasp/bee hybrid species spawned by zombies. When the scent of consumed fruit is increased with additional fruit, alcohol or sweets, queens will flock until the odor dissipates.
Zombait
Unsurprisingly meat attracts zombies. If meat is consumed after being combined with additional meat products, grains or sweets zombies will find the eater irresistible for a short amount of time. Be very careful with this Combo Food.
Repulse
Eating grains can often produce excessive flatulence. Combining grains with additional starches, such as alcohol, will produce a specific flatulence that makes the individual undetectable to zombies until the stench has dissipated.
Pain Killer
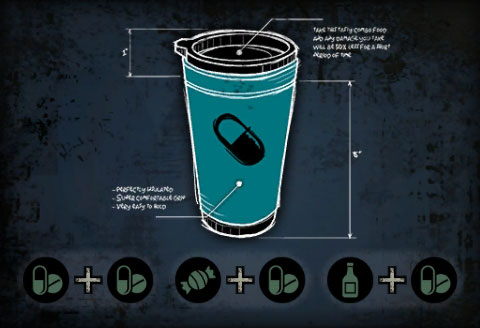
Drugs combined with sweets, more drugs or alcohol increases the user's tolerance to pain and reduces the amount of damage taken while the effects are still active.
Energizer
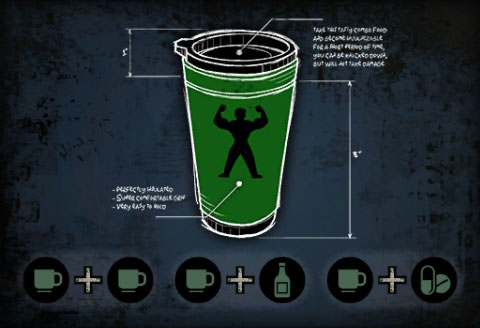
Mixing non-alcoholic drinks with alcohol, other non-alcoholic drinks or drugs provides the user with some protection against attacks. When this combo is consumed the user will receive less damage when knocked down.
Quick Step

Combining sweets with other sweets, fruit or alcohol increases glucose levels in the body for a short period of time. Upon consumption, this combination will release energy to the muscles that can be used to increase stamina while running or sprinting.
Randomizer
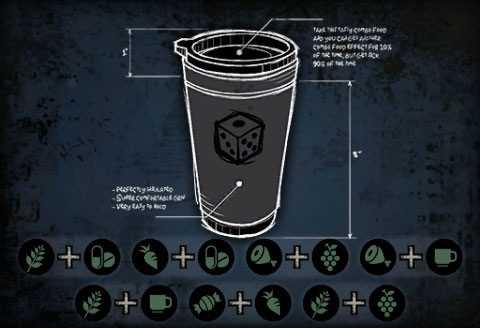
While outright experimentation with food combinations can results in some disastrous results occasional random combinations of these food types have resulted in some surprising benefits similar to those listed above. Use at your own risk: meat with fruit or drinks, sweets with vegetables and grains with fruits, drinks, or drugs.
The Map & Missions Screen will help you track your mission progress and show you points of interest such as Safe Zones or useful item locations. You can also use the Map Screen to select any active mission from the ones available and track it outside the Survival Guide or add your own custom waypoints for easier navigation around Los Perdidos.
Map Controls
- : Scroll Map
- : Navigate Mission Panel
- / : Zoom in / Zoom out
- (Click): Set Waypoint
- : Toggle Legend / Mission Panel visibility
- : Select highlighted mission
- : Hide Legend / Mission panel
In the Player Screen, you will be able to upgrade and acquire new abilities as well as get information about Skills, PP Trials or Books. To move between the different tabs in the Player Screen, use and .
Attributes
As you level up you will gain Attribute Points which can be spent here to unlock new abilities and upgrades for them. Check the Leveling Up section of this guide to learn more about Attribute Points and how to gain and use them.
Skills
The Skills tab lists all special moves and techniques currently known to Nick. Next to their descriptions you can find the controls used to execute each skill. An icon will highlight the recently-unlocked moves to help identify them easily.
PP Trials
Any PP Trial completed or active will show up in this tab. You can check the current progress, the objective and the reward for completing each one of them. PP Trials can be completed in many ways. Be sure to check this tab often.
Books
Books will give you useful passive effects such as more damage, increased survivor health or extra PP for defeating enemies. Only one book can be equipped at a time. In the Books tab, you will find all the books that have been discovered, along with descriptions of their effects.
You can change your equipped book at any time (assuming you have at least one) from this tab. The currently equipped book will also be displayed under the health bar, accompanied by a description of its effect.
This tab contains all the information which you might need about the game controls, systems and mechanics. Some of the tutorials also offer other helpful tips.
The tabs for Weapon/Vehicle Blueprints and Food Recipes are quite similar. Both have a list on the left side showing all the known items, with the right side showing the combination(s) used to create them.
Most of the crafted items can be created using more than one ingredient combination. In the case of Food, those extra combinations will be discovered by creating them a first time; in the cases of Weapons or Vehicles, they are unlocked all at once after finding the Blueprint. For more information about combining items, check the "Combining Items" section of this guide.
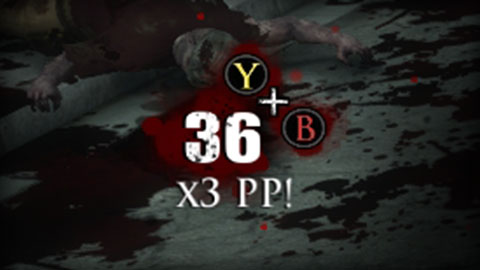
Prestige Points (PP) are the measurement of your experience and progression. PP is used to level up and unlock powerful Attribute Upgrades like a larger inventory, increased weapon damage or tougher survivors. PP can be gained in multiple ways:
- Killing enemies
- Kill Streaks
- Completing Tasks
You can check your current PP anytime in the bar at the top of the screen. When this bar fills up, you will gain a level and one or more Attribute Points.
Killing enemies
Dealing with your enemies in Los Perdidos is the main way to earn PP. The amount given depends both on the enemy type and the method used to finish it:
- Zombie Kills: Every zombie killed will give out a small amount of PP.
- Combo weapon zombie kills: Kills made with combo weapons will give out a larger amount of PP. Some combo weapons have multiple attacks with different PP rewards per kill.
- Special NPC kills: Some special enemy types are tougher than regular ones and will give out extra amounts of PP when killed. These enemies include: SPEC OPS members, Bikers, King Zombies, Zombie prisoners...
Kill Streaks
This meter counts the number of enemies you have defeated in a single streak. Reaching higher numbers will allow you to multiply the amount of PP gained per kill temporarily but it will also get progressively more difficult as the time allowed to continue the combo decreases.
Every few kills during a single streak will enable you to perform a Skill Move grab. This special kill gives out larger amounts of PP and will destroy even special zombie types in one hit. Check the Combat section for more information about Skill Moves.
Completing Tasks
As you explore Los Perdidos, you will find many things to do in the city: rescue Stranded Survivors, find collectible Dead Rising Memorabilia... all these activities will yield generally more PP than fighting zombies but are harder to complete:
- Side Missions: Early into the game you will find A ZDC phone. It will give you information about some of the survivors who are still alive in Los Perdidos. Help them to get PP and other rewards.
- Psycho Battles: A number of dangerous Psychopaths roam the city. Find and defeat them to gain considerable amounts of PP.
- Survival Training: Survival Training missions are short, re-playable missions which challenge you to kill the maximum amount of zombies within a specified time limit while using a particular weapon or vehicle. You will receive different amounts of PP depending on your results.
- PP Trials: These are mini challenges which permanently run in the background and reward you with good amounts of PP upon completion.
- Collectibles: There are different collectible items scattered around in Los Perdidos: Commemorative Frank West statues, ZDC Speakers and Tragic Endings. Everytime you find and interact with one of these items, you will receive a PP reward. Complete a collection to get a larger PP bonus. For more information check the Collectibles section.
Every time you level up, you will gain some Attribute Points. These points are the currency used to purchase upgrades for Nick in the Survival Guide.
Upgrading Attributes
You can upgrade many different aspects of Nick's character. These upgrades are divided in seven categories, which cost progressively more Points as you move deeper in one character trait. The last upgrade for each of the 7 categories will be locked out until you reach the highest character level.
Combo Categories
As well as acquiring new skills with the Upgrades, Attribute Points can be spent to unlock Combo Categories. Buying a Combo Category makes it easier to create Combo Weapons and Vehicles as it allows you to substitute items of the same type. Check the "Combining items" section for more details about combo weapon crafting. One of the important categories you can purchase is "Food". After acquiring it, you will be able to combine any two edible items to create combo food which not only restores health, but also gives useful temporary buffs. Experiment with ingredients to discover all the available combinations.
Attribute Upgrades
LIFE
- Shaping Up (1 AP): Adds one Life Cube to your health bar.
- Survivalist (1 AP): Adds one Life Cube to your health bar.
- Healing Touch (2 AP): Adds one Life Cube to your health bar and increases the health of Survivors in your posse.
- Take Your Vitamins (3 AP): Adds one Life Cube to your health bar. Also increases Life recovered by food items and the duration of Combo Food buff effects.
- Time On My Side (3 AP): Adds one Life Cube to your health bar and enables you to regenerate a partially-depleted Life Cube. Regeneration kicks off a few seconds after leaving combat.
- Nine Lives (4 AP): Adds one Life Cube to your health bar and makes survivors retreat instead of die when they get their Life depleted making them available again in the Survivor Bulletin Board. Level 50 Upgrade:
- Almost Immortal (4 AP): Adds two Life Cubes to your health bar and enables regeneration of empty Life Cubes. Regeneration kicks off a few seconds after leaving combat.
INVENTORY
- Deep Pockets (2 AP): Adds one slot to your inventory.
- Material Man (3 AP): Adds one slot to your inventory.
- Collector (4 AP): Adds one slot to your inventory.
- More Is More (5 AP): Adds one slot to your inventory. Level 50 Upgrade:
- Hoarder (5 AP): Unlocks the Blueprint for the Mobile Locker combo vehicle. This useful truck serves as a mobile base of operations and an almost unlimited weapon supply.
MELEE
- Scrapper (1 AP): Unlocks a new Skill Move and increases the durability of all melee weapons.
- Street Fighter (2 AP): Unlocks a new Skill Move and increases the damage inflicted with melee weapons.
- Brass Knuckles (3 AP): Unlocks a new Skill Move and increases the durability of all melee weapons.
- Bruiser (4 AP): Unlocks a new Skill Move and increases resistance to damage from melee attacks.
- Slippery (4 AP): Unlocks a new Skill Move and reduces the chance of being grappled by a zombie. Level 50 Upgrade:
- Gladiator (4 AP): Greatly increases the damage and durability of melee weapons.
RANGED
- Sharp Shooter (2 AP): Increases the ammunition available in ranged weapons.
- The Best Offense (3 AP): Increases resistance to damage from firearms, explosions and fire.
- Marksman (4 AP): Increases the damage of all ranged weapons.
- Dead Eye (5 AP): Unlocks piercing ammunition for most ranged weapons. Level 50 Upgrade:
- Trigger Man (5 AP): Greatly increases the damage and ammunition of ranged weapons.
MECHANIC
- Tinkerer (1 AP): Increases your combo crafting speed.
- Derby Driver (2 AP): Increases the force of vehicles, making swimming through crowds of zombies a lot easier.
- Man Magnet (3 AP): Adds two to the maximum amount of survivors in your posse and increases the damage from male survivors.
- Grease Monkey (4 AP): Increases vehicles' resistance to damage.
- Crew Chief (4 AP): Increases your combo crafting speed to almost instant creation. Level 50 Upgrade:
- Untouchable (4 AP): Vehicles won't explode while you are driving them unless they are flipped upside down.
AGILITY
- Speedster (1 AP): Increases how long you can sprint before getting tired.
- Bouncer (1 AP): Unlocks a new Skill Move and reduces the damage taken from falls.
- Hustler (2 AP): Increases how long you can sprint before getting tired and reduces the recovery time between sprints.
- Ninjatude (3 AP): Reduces the time needed to stand up again after being knocked down to the ground and allows you to dodge more often.
- Speed Force (3 AP): Increases your maneuverability while sprinting.
- Mob Mentality (4 AP): Increases your force when "swmming" through zombie crowds. Level 50 Upgrade:
- Bolter (4 AP): Gives unlimited stamina, allowing you to sprint forever.
SMARTS
- Man Happy (1 AP): Increases the radius for collectible items to be shown on the map and increases the PP gained from enemy kills.
- Food Mechanic (1 AP): Unlocks the Blueprints for Combo Weapons made using food: The Beer Hat and all the different Buffet Carts.
- Mean Girls (2 AP): Adds two to the maximum amount of survivors in your posse and increases the damage from female survivors.
- Baritsu Fighter (3 AP): Reduces the number of kills needed to enable Skill Move grabs and increases the PP gained from enemy kills.
- Book Worm (3 AP): Increases the effects of equipped books.
- American Dream (4 AP): Increases the time allowed to continue a Kill Streak and increases the PP gained from enemy kills. Level 50 Upgrade:
- Library Card (4 AP): You can equip all books at the same time.
Get additional in-game missions and content. Download and run the Xbox SmartGlass app on your smartphone or tablet, then sign in to Xbox Live and connect to your Xbox One console.
Jamie Flynt
Once you find the ZDC agent’s phone Jamie will be calling in to offer missions to help survivors around the city. If you're using Xbox SmartGlass Companion, Jamie will make personal calls to Companion for missions that are not otherwise available. These exclusive missions include content and rewards unique to Companion.
The codes Jamie sends you can be used to activate ZDC civil defense system apps or they can be used to open the strong boxes located around the city. These strong boxes were located around the city as support for ZDC agents dealing with illegals. These boxes also function perfectly for survival during a zombie outbreak.
You’ll find a large number of apps on Xbox SmartGlass Companion once it is connected to the ZDC network.
TEXT

Text: Jamie will also send you text messages with useful and interesting information. Use the text app to read your messages from Jamie.
TO DO

To Do: This is a list of your current missions. Select a mission here to have it become your currently-tracked mission in the game. Selecting a mission from the To Do list will bring up the map focused on the selected mission location.
MAP

Map: Use the map to view current missions and waypoints. Apps like the Find Store and Find Item place a waypoint on the map to help you locate items you are looking for.
SETTINGS

Settings: Choose from available Ringtones and Wallpapers to customize the look and sounds of Companion when it is connected to the ZDC. Find ZDC App Updates in the world to gain additional wallpapers and ringtones.
BACKUP
Backup: If you are running around and need some additional help, call in backup from survivors you have previously saved. If you have survivors available at the Survivor Bulletin Board, and your posse isn’t full, someone should be by to help you out a.s.a.p.
FIND STORE

Find Store: Choose the icon which fits the type of store you are looking for and Companion will set a waypoint to the store. If you are looking for military-type clothing and weapons try a gun store. Looking for a rake? Try a hardware store.
FIND ITEM

Find Item: Select an icon which indicates the type of item you want to find and this app will set a waypoint to the closest item of that type. Looking for a grenade? Choose the explosives icon. Want an assault rifle? Choose the gun icon.
ZDC
ZDC: Start up this app to access up to 3 different apps of the ZDC civil defense system. These apps will let you unleash the full power of Companion. Earn codes and unlock all 3 apps by doing missions for Jamie.
- Drone Strike: Call in an automated drone artillery strike where you are looking, wreaking explosive mayhem on threats nearby.
- Gun Strike: Remote gun turrets are on call and will rain down automated gunfire on threats which get in your way.
- Flares: Use the Flares app to call in a burst of flares which should disable zombies for a city block.


HINTS

Hints: Think of the Hints app as a mini strategy guide. Here you can find info on many aspects of the game such as combo weapons, combo foods, psychos, hidden paths and safe zones. Find ZDC App Updates in the world to gain additional hint pages.
- ZDC App Update: App Updates can be found hidden around the environment of Los Perdidos. Pick them up and you will gain new wallpaper, ringtones or pages for your Hints app.
- Safe Zone Tips: The hints relay additional info on the safe zones you can access around the world. Clear out safe zones to earn access to special lockers for weapons, clothing and Survivors!
- Arms Enhancement: Read these hints to learn more about the combo weapons available to you in the game.
- Survival Nutrition: These hints will point you in the right direction to create some of the best combo foods. Read these hints to find out what each does to boost your survivability and skills.
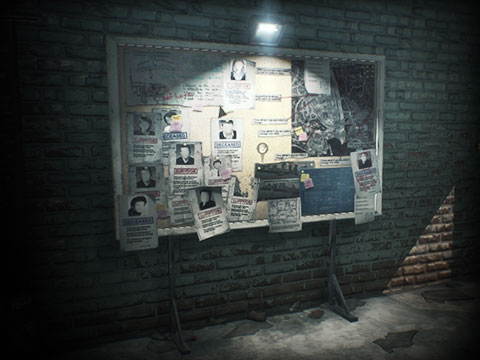
- ZDC Watch List: This list focuses on some of the most dangerous individuals living in Los Perdidos. Who knows what would happen to them if a traumatic event, like a zombie outbreak, were to occur.
- ZDC Travel Tips: If you like exploring secret paths these hints are for you. Follow the tips to find secret areas and stockpiles of goodies that will make your zombie apocalypse that much more fun.


NEWS

News: Check periodically for News flashes and background information which are tied to the story as it unfolds in Los Perdidos.
PHONE

Phone: The Phone will ring when you have a personal request or message incoming from Jamie Flynt. If it is a particularly important call, and you miss it you will see an indicator on the phone icon of an awaiting message. Use the phone icon to call Jamie back at any time you have a missed call.
- Jump
- Interact (Pick up/open door)
- Light attack
- (Tap) Heavy attack
- (Hold) Ground attack
- (Hold) Sprint
- (Tap) Cycle weapons
- (Hold) Open inventory
- (Hold) Aim
- Fire / Throw
- Move
- (Click) Dodge
- Camera
- (Click) Reset Camera
- Answer call
- Mini-map & Active Mission display
- Survivor Commands
- (Tap) Drop equipped weapon
- (Hold) Store equipped weapon
- Survival Guide
- Pause Menu
- Home
- E-Brake
- Exit / Enter vehicle
- Primary attack
- Secondary attack
- Brake
- Accelerate
- Steer
- (Click) Horn
- Camera
- (Click) Reset Camera
- Survival Guide
- Pause Menu
- Home
Grapple Escapes
To use Kinect’s gesture detection to escape from zombie and boss grapples set Grapple Controls to 'Kinect' in the Options menu and ensure the person holding the Xbox One Wireless Controller is in the Kinect’s play space. When you are grappled you will see this on-screen prompt:
Quickly move your body before the meter runs out to escape the grapple. Any movement or gesture you make will allow you to break out of the grapple.
Pointing Survivor Commands
When you have a Survivor Posse following you, you can use Kinect to show them where to carry out your orders. Point at the screen with your right hand and a blue indicator will appear in the world.
Using voiced survivor commands or to give a command and your posse will carry the order out wherever you were pointing.
Kinect listens for certain keywords which can be used to control the game. When Kinect recognizes a keyword, a blue microphone icon is displayed in the upper-right corner of the screen:
If the Kinect has difficulty understanding a spoken command, a red microphone icon is displayed:
In-Game Kinect Language Reference
Kinect can understand the following voice commands during normal gameplay. Some commands may not be available in all areas of the game.
Zombie Lure
Say one of the following keywords to lure nearby zombies toward you:
- Over Here
- Here I Am
- Hey Zombies
- Come And Get Me
- Come At Me
Boss Taunts
Say the following keyword when fighting non-psycho story bosses:
- You’re Crazy
Say the following keyword when fighting the “Envy” psycho:
- Copy Cat
Say the following keyword when fighting the “Gluttony” psycho:
- I'm Hungry
Say the following keyword when fighting the “Greed” psycho:
- Greedy
Say the following keyword when fighting the “Lust” psycho:
- Whoa Kinky
Say the following keyword when fighting the “Pride” psycho:
- You Look Strong
Say the following keyword when fighting the “Wrath” psycho:
- Calm Down
Say the following keyword when fighting the “Sloth” psycho:
- You Psycho
Menu Navigation
You can use your voice to quickly navigate through the game's menus. When navigating the Main Menu, Pause Menu or the Options Menu, any item which has a microphone icon next to it when selected can be activated by saying the item title.

During gameplay you can say “Pause Game" to bring up the Pause Menu or say “Survival Guide” to bring up the game’s Survival Guide. You can return to gameplay by saying “Back” or “Resume”. When in the Survival Guide section, you can go to any screen by simply saying its title. All player sub-screens are supported. The following screens are accessible through voice commands while in the Survival Guide:
- Food Recipes
- Map and Missions
- Pause Menu
- Player
- Tutorials
- Vehicle Blueprints
- Weapon Blueprints
- Attributes
- Books
- PP Trials
- Skills
You can also say one of the following key-phrases from within the Pause Menu or Survival Guide to return to gamplay:
- Back
- Resume
Survivor Commands
You can use your voice to quickly give your Survivors commands when they are following you. When one or more survivors are following you, Kinect understands the following phrases:
Say the following keyword to tell your survivor posse to attack nearby enemies:
- Attack
Say the following keyword to tell your survivor posse to follow you:
- Follow Me
When in Ranged Mode or when pointing at the screen with your right hand, say one of the following keywords to tell your survivor posse to go to the indicated location:
- Go There
- Go Over There
Say the following keyword to tell your survivor posse to look for useful items near the player. If you are in Aim Mode or pointing with your right hand, your posse will search near the indicated location:
- Scavenge
Default Clothing
If you are wearing custom clothing, say the following keyword to change back into Nick’s mechanic coveralls:
- Change Clothes
Drop Current Item
Say the following keyword to drop the item Nick is currently holding:
- Drop Current Item
Global Speech Commands
Dead Rising 3 supports the following global speech commands throughout the game.
Show the Pause Menu
- Xbox Pause
- Xbox Show Menu
Resume gameplay
- Xbox Play
Show the Map & Missions screen
- Xbox Change View
Return to the previous screen while navigating menus
- Xbox Go Back
Technical support is available seven days a week, including holidays. For help with this game, Xbox Live, or your Xbox One console, visit us online at www.xbox.com/support. We are also available on Twitter @XboxSupport.