-
Casual: Free for all mode. Play with friends or against the AI.
-
Online: Play competitively online to cement your standing on the global leaderboards via quick or custom match types. Also play tournaments over multiple rounds.
-
Career: Take control of a star player and dominate the competition, or start off as a rookie and work your way through the youth leagues to the top of the competition.
-
Competition: Play a season of the major Rugby League competitions or create your own Leagues and Tournaments
-
The FanHub: Create and share your favourite Rugby League stars. Create teams, leagues and referees as well.
-
Drills: Hone your skills by practicing conversion kicking, passing, tackling and play maker drills.
-
Settings: Adjust gameplay and audio settings, view controls and view credits. Choose a favourite club and view user statistics.
Rugby League Live 3 features Quick Passing, Deep Cut Out Passing and Flat Cut Out Passing systems.
-
Quick Passing: Pass to the first receiver. passes to the first player on the left, passes to the first player on the right.
-
Deep Cut Out Passing: Safely pass to a receiver at the expense of the receiver's forward velocity. Hold or and tap , or for the 2nd, 3rd or 4th receiver on the left or right side.
-
Flat Cut Out Passing: Put the ball ahead of the intended receiver allowing them to run onto the ball with speed, but at risk of interception. Hold or and double tap , or for the 2nd, 3rd or 4th receiver on the left or right side.
-
Arm Pin: Hold to execute; prevents the ball carrier from Offloading but is easier to Fend than a Low Tackle.
-
Low Tackles: Hold to execute; harder to Fend or Evade than an Arm Pin but leaves the ball carrier's arms free for an Offload.
-
Diving Tackles: Double tap to execute; a last ditch tackle which will dive at the ball carrier. If the tackle misses then it will take a few seconds to recover.
-
Drag Tackles: Move in the direction you want to drag the ball carrier. These take into account both tackler and ball carrier's weight, meaning a thinner tackler won't be able to drag a bigger ball carrier whereas a bigger tackler can drag a smaller ball carrier. This difference in weight will also dictate how far the drag tackle can be moved.
-
Driving Tackles: As the ball carrier, move in the direction you want to drive the tackle in. The ball carrier's weight and height determine how far a tackle can be driven.
-
Big Hit: Click and hold to execute; will cause the recipient to lose a large amount of stamina and also increase the likelihood of a ball spill.
-
Hit Ups: As the ball carrier, click and hold to execute; will cause the tackler to bounce off the ball carrier, potentially freeing up space for you to move into.
-
Stamina: Sprinting and being on the end of Hit Ups and Big Hits will have a large impact on Stamina. Low Stamina effects a player's ability to not only run, but tackle and be disciplined in formation.
-
Fending / Break Tackles: Push up on to Fend. Push down on to Goose Step. Fends target the defenders ahead and will be most effective against Arm Pins. Goose Steps are best used to evade Diving Tackles.
-
Ball Stripping: In certain one-on-one tackles it is possible to attempt a Ball Strip. When you see a struggle for the ball, press multiple times to attempt to keep or strip the ball. The higher the difficulty, the more button presses you will need.
Kicking is a 2 step process: first it has to be lined up, then it has to be executed. For this, a kick metre appears on screen.
Use to aim the kick, taking into account wind speed and direction as indicated by the arrows. Moving forward or back will lower and raise the trajectory of kick respectively.
The kick metre has a blue zone and a red zone. To power up the kick, press and hold and release when the blue zone is as close to the red as possible. This will result in an accurate and powerful kick, but releasing too late will result in an innaccurate kick.
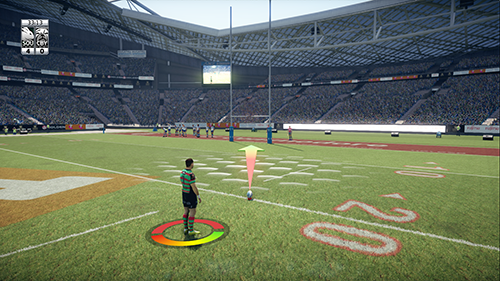
Position the tee by using . Confirm the position by pushing . Control the direction of the kick with . Set the power of the kick by moving up or down, the power of the shot will be indicated by the colour of the arrow. The arrow will be green for a low powered shot and red for a powerful shot. Add curve by moving the left or right.
To take the kick, press when you expect the meter to reach the green at the contact point between the player and ball. The further in the green, the more accurate the kick.
Aftertouch can be applied to the ball by pushing the left or right while the ball is in flight.
Hold to display the kick target. Aim the Punt . Hold to increase the power of the kick and release to Punt. To cancel release
Hold to display the kick target. Aim the kick with . Hold to increase the power of the kick and release to Bomb. To cancel release .
Tap for a short Grubber or Hold & Release for a long one. Direct the kick with . Most useful near the try line.
Tip: Direct the ball through the defensive line so you or a team mate can dive onto the ball and score.
Hold near a loose ball; most useful when you do not want to pick up the ball under pressure.
Tip: Use a Toe Kick when you have a speed advantage over your opponents.
Tap to execute; chips over the defensive line. Direct the ball so you or a team mate can run onto it while the defenders check their runs and turn to pursue.
Tip: Chip kicks are a good offensive tool to catch the defence off guard.
Hold to power up the kick. The ball will travel in the direction the player is facing so always try to face the goals before kicking.
Tap to perform a Try. Double tap to perform a Diving Try. Hold to make the player dive onto a loose ball. Diving tries are more likely to cause a bad spill.
Sidesteps are a great way to get a defender off balance. Push left or right on the to perform a Sidestep in the desired direction. A Sidestep followed by another in the opposite direction will perform a Shimmy.
Sidestepping will be most successful against a Low Tackle.Tip: Try using Sidesteps and Shimmies in combination with Fends and Goose Steps to improve your chances of evasion.
Players can be sent off for continuous High Tackles. Players will receive warnings from the referee before being sent off. Send offs will be represented by a red card in Team Management and a red notch in the score HUD.
Players can be Sin Binned for continuous Held in Tackles. Players will receive warnings from the referee before being sent off. Sin bins will be represented by a yellow card in Team Management and a yellow notch in the score HUD.
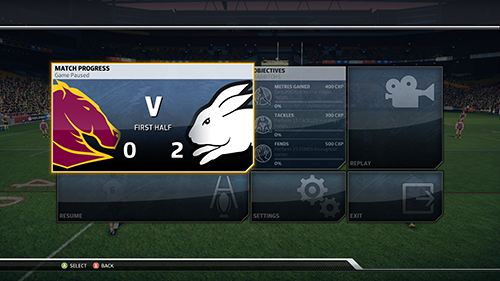
Press during gameplay to display the in game Pause menu. From the pause menu you may select either Resume; Match Progress; Replay; Team Management; Side Select; Settings or Exit, or view the Challenges / Objectives for the current match. The menu options will change based on the mode you are playing.
If one of your players is injured, an icon is displayed on screen under the player. To resolve the injury, you must pause the game and interchange the player via the Team Management option. Interchanging an injured player off the field will count towards the maximum number of interchanges allowed.
View your ranking compared to the rest of the world.
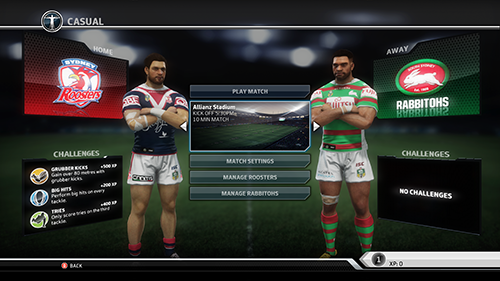
To select either the home or away side, move your controller icon to the side you wish to join and press to confirm. Leave your controller centred away from both to spectate.
Move left and right to select a competition and team for the home and away sides. Press to confirm.
Move left and right to select the jersey for your team and press confirm.
Move up and down to choose an option, then left and right to configure it. Select from:
-
Play Match: Proceeds to the match.
-
Match Settings: Adjusts various match settings including Half Length, Stadium, Weather and Difficulty
-
Team Management: Used to adjust the Team Line-Up and assign various player roles.
-
Quick Match: Play competitively with other players online. Skills are normalised and match settings pre-set to avoid any fuss from the users end.
-
Custom Match: Customise your competitive experience with other players online; adjust various match settings including Half Length, Stadium and Weather, while also choosing whether to allow official clubs, custom clubs and normalised skills. You may also set the match to private so that it can only be searched by name.
Tournaments:
-
Public Tournament: Allows you to play an online tournament against 7 other online players. Battle through Quarter Finals, Semi Finals and Finals to determine the winner!
-
Private Tournament: These tournaments feature up to 16 clubs and have a name set so other players can locate them. You can choose the ruleset, number of clubs and whether or not to use fake clubs to fill out any unfulfilled spots.
-
- Headlines: Will show you the most relevant news items as your career progresses. You will be able to see match and competition results as well as ladder positions for your team.
- Objectives: Tasks that you will be able to aim to complete either for a single match or over several matches to earn extra career points to spend on boosts.
- Calender: View upcoming events and choose to simulate ahead to a specific date.
- Transfers: View all transfers throughout yours and other leagues.
- Your Competition: View details of the competition you are in; fixtures; results; season ladder; season stats and player of the year award voting.
- Ladder: View the ladder of yours and other competitions.
- Fixture: View fixtures and results of yours and other competitions.
- Other Competitions: View other competition fixtures and results, ladders, stats and player of the year award voting.
- Settings: Adjust the settings of your current career, such Half Length, Match Difficulty, Currency, Injuries and Recruiting Difficulty.
- Continue Career: Continue your most recently created career.
- Load Career: Load any career you have started.
- Delete Career: Delete careers you no longer want.
Select New Career by pressing . Ajdust settings you wish to have for your career, such as Half Length, Match Difficulty, Currency, Injuries and Recruiting Difficulty.
Select if you would like to swap out any Leagues for a FanHub created League, then proceed by pressing .
Choose whether you want to start your career as a Star Player, Rookie Player or Coach.
Allows you to take control of an existing player in any competition and attempt to continue their career and take them to the ultimate heights of winning titles and MVPs.
Play as any player from any league. Select and press to play.
Start a career at any age and make your way through the lower leagues right up to the big ones!
You will first be asked to join a League and Club. You may choose any club you like, but if you choose a stronger club it will be harder to get into the first grade side.
Afterward, you will need to set the identity of your player, with options including First and Last name, Jersey Number, Positions, Country of Birth and Representative Country. When done, highlight Continue and Press .
Next you will be asked to set the appearance of the player, which you can build from scratch or make a copy from the FanHub or default player. When done, highlight Continue and Press .
Finally, you will be asked to set the skills and attributes you wish to assign your player. Take note of your Position dscription to assist you in what areas you may wish to put your allocated points into. Once you have spent all your points, press to start your career.
Allows you to manage, recruit and train your club to the play style you prefer over a number of years. You may also choose whether to play the matches out or spectate them.
You will be able to choose which League and Club you can take control over. Over you have chosen the Club you wish to coach, proceed by pressing .
Once you have chosen a Club to coach you will be given several sponsorship options to choose from. Each sponsor will have a sign on fee and bonus if you complete the given objectives, you can choose to risk losing a big bonus for a harder objective or go for an easier objective with a lower bonus. Press when you have chosen your desired sponsor.
After setting up your sponsor you will then be taken to the support team options. Here you will be able to select from several support team options all with their own benefits. Each support team has 4 skills that they can offerm attracting players, retaining players, injury/fatigue recovery and form/confidence. You will be able to choose whether you wish to take a balanced support team in or whether you go for a support team that specialises in a apecific skill but may lack in other areas. Press when you have chosen your desired support team.
Choose your captain to lead your team. Once you have selected your captain, press to proceed to the Career Hub.
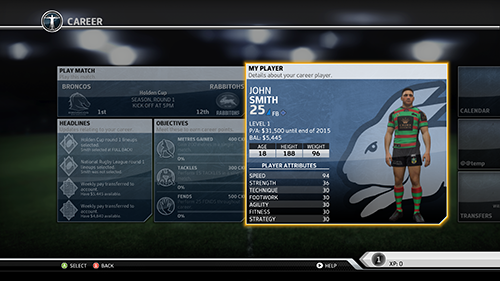
The Career Hub consists of a number of areas which can be utilised to help manage and control your career game.
Allows your to quickly skip forward to your next event. On the Tuesday before a match you will be asked to pick your squad for the upcoming match. You will also be able to auto-generate the squad if you wish.
After selecting your squad you can move forward to match day. From here you are able to choose whether to play or simluate the match. If choosing to play you will be able to select attribute boosts for that match. To purchase a boost, highlight the boost you wish to purchase and press . If you wish to get a refund on your boost, press again on that boost. When you're ready to play, select the Play Match tile and press to proceed.
The Club Management screen allows you to view information about your playing roster. View a player's form, injury status, suspension status and contract status.
-
 At Peak Form
-
 Improving
-
 No Change
-
 Minor Loss of Form
-
 Loss of Form
-
 Injured
-
 Suspension
-
Important Players: Upon entering recruiting you are offered the 3 most important players in positions that will help your yeam the most. From here you can jump straight into negotiations offering a contract amount and contract length. To submit an offer to that player, select Submit Offer and press .
-
Out of Contract Players: See players that are out of contract on your roster at the end of the season and offer you the opportunity to re-sign them immediately by offering a contract amount and contract length. To submit an offer to that player, select Submit Offer and press .
-
Searching For Player: Search players that are coming out of contract from other other teams. Press to filter players by surname, position, role, age, league and club. To confirm your filter options, press .
-
My Players: See players contract status and salary and attempt to re-sign them.
Competition mode allows you to play the major Rugby League competitions or a custom edited competition.
-
New Competition: Select either NRL or Super League to play a single season of one of those leagues. Select Custom League or Tournament to play a customised competition. Upon starting New Competition you will be presented with your League's fixture, ladder, stats and finals fixture.
Press to play a match between the highlighted teams. Press to simulate the match and to simulate the round.
-
Continue Competition: This will allow you to quickly return to your last played competition.
-
Custom League Competition: A customised league with options for up to 16 clubs, fixture type, how many times each team will play each other, the finals system and the trophy that is awarded at the end of the competition.
-
Custom Tournament Competition: A customised tournament with options for up to 16 clubs. Also allows you to choose how many users can control each team.
-
Load Competition: Select and load previously started competitions.
-
Delete Competition: Select and delete competitions.
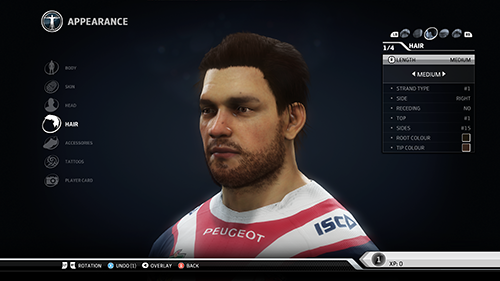
The FanHub is a creation suite that allows you to create, share and download players and teams from the community.
Edit an Official 2015 Player or create your own custom player that can be a free agent or part of an official club.
The Player Editor allows you to edit a players' appearance, identity and attributes. Also allows you to customise a players' headgear, strapping, tattoos and boots.
Edit an Official 2015 Club or create your own. The club editor allows you to change the identity, roster, home ground, lineups and jerseys of any club.
Create and edit the referees that appear in your matches
Create and edit your own custom League to feature in Career mode.
View from thousands of uploaded players and clubs.
Learn the skills that will help you improve your technique in the game. Compare you scors with your friends and others from around the world with leaderboards for each drill.
-
Goal Kicking Drill: Learn conversion kicking and timing
-
Passing Drill: Learn the timing of passing as well as how to make cut out passes
-
Tackle Drill: Learn the timing of tackling, as well as which tackles are right for which in-game situations
-
Playmaker Drill: Learn which kicks go with which in-game situations from the playmaker
-
Drill Player: Select the Drill Player you would like to take the drills
-
Favourite Club: Nominate your favourite NRL or Super League club. This will dictate what team shows up at all team select menus.
-
General Settings: Adjust gamma, gameplay, camera and controller settings.
-
Audio Settings: Adjust audio settings and which tracks to enable or disable during menus.
-
Change Primary User: Change the primary user for the current session.
-
Controls: Select to view Attack, Defence or Loose Ball controls.
-
User Statistics: Select to view earned statistics.
-
Credits: Select to view game credits.
-
Deep in your defensive zone use Hit Ups to wear down your opponents' stamina and protect the ball.
-
Fending is not as safe as a Hit Up and also has a small chance of a ball spill.
-
Use After Touch to alter a conversion kick's trajectory after it has been kicked. After Touch will be more effective as the kick fades.
-
A player's stamina is represented by the size of the Sprint Metre; this will shrink over the course of the match.
-
Sprinting while performing an Arm Pin tackle risks in a High Tackle.
-
Keep holding the tackle button to hold a player down in the tackle.
-
Momentum is critical to breaking tackles. Ensure you are sprinting when fending.
-
Drag Tackles take into account both tackler and ball carrier's weight, meaning a thinner tackler will not be able to drag a bigger ball carrier but a bigger tackler can drag a thinner ball carrier. The difference in weight will dictate how far the tackle can be dragged.
-
Complete Objectives and Challenges to earn extra XP towards your profile or career spending money.

BIG ANT STUDIOS
www.bigant.com
CEO
Ross Symons
DEVELOPMENT DIRECTOR
Mike Merren
TECHNICAL DIRECTOR/ENGINE LEAD PROGRAMMER
Matt Ellison
GAMEPLAY LEAD PROGRAMMER
Charles Henden
LEAD ARTIST
Craig Bowler
LEAD ANIMATOR
Dara Ung
SOUND
James Langford
UI/METAGAME LEAD PROGRAMMER
Warren Spence
UI DESIGN/ART
Clare Spoelstra
NETWORK PROGRAMMER
Blake Preston
GAMEPLAY PROGRAMMERS
Stuart Cameron
Shaun Clifford
Andrew Fenn
Michéal Larkin
Rachen McQueenie
Ben Warwick
ENGINE PROGRAMMERS
Brooke Hodgman
Greg Mildenhall
Mark Wayland
UI/METAGAME PROGRAMMER
Greg Power
ARTISTS
Anthony Fordham
Iain Robertson
Jacob Thomas
ANIMATORS
Matt Duce
Ross Threlfall
FANHUB SERVER
Scott Pederick
QUALITY ASSURANCE
Jojo Azrein
Somesh Bahuguna
Alex Diakovsky
Daniel Dunphy
Jarrod Shaffer
ADDITIONAL ENGINE PROGRAMMING
Shaun Stamper
David Serafim
ADDITIONAL ART
David Morrissey
ADDITIONAL TESTING
Sam Merren
Antony Symons
SPECIAL THANKS
Cindy and Lily Cameron
Frank Colautti
Daniela Markovic
Tegan Spence, Bobby and Jacob Spence
Teagan, Jojo, and Natalie Symons
Holly Warwick
Amy, Jade and Sharon Wayland

TRU BLU ENTERTAINMENT PTY LTD
www.trublu.com.au
MANAGING DIRECTOR
Sebastian Giompaolo
ASSOCIATE PRODUCER
Trent George
Bianca Giompaolo
INSTRUCTION MANUAL
Daniel Kajfes PACKAGING DESIGN
Wayne Hazel
SENIOR QA
Jack Chen
Colin Leung
QA TESTING & SUPPORT
Adrian Capkunovski
Keith Franks
Chris Gould
William Newman
NRL
www.nrl.com
RFL
www.superleague.co.uk
www.therfl.co.uk
www.englandrl.co.uk
SENIOR COMMERCIAL MANAGER
Gary Linke
MARKETING EXECUTIVE
Emma Shaw
SPONSORSHIP & ACCOUNT EXECUTIVE
Emma Haworth
NSWRL
Head of Commercial and Community Relations
Jodie Cross
QRL
COMMERCIAL MANAGER
Troy Morton
CANTERBURY OF NEW ZEALAND
All intellectual property rights in the NZ Warrior’s playing kit design belong to Canterbury of New Zealand Limited or its licensors © Canterbury of New Zealand Limited 2015.
INTERNET MANAGER
Matthew Trumble
MARKETING MANAGER
Phil Williams
AUDIO ENGINEER
Mark Tanner (Mark Tanner Sound)
COMMENTARY VOICE TALENT
Phil Gould
Andrew Voss
REFEREE VOICE TALENT
Matt Cecchin
Commentary & Referee Audio Recorded At Mark Tanner Sound
MUSIC
Olux - Assult Squid
Olux - Shrimp Fingers
Bad Boys Of Sound - Stormline
The Ants - She Knows My Name
The Ants - Flying To The Sun
The Ants - Taken For Granted
The Ants - No Need to Grow Up
PLAYER PHOTOGRAPHY
William Booth (Photosport)
Ross Smart (Bulldogs Player Photography)
Colin Whelan (Action Photographics)
AUSTRALIAN STADIA PHOTOGRAPHY
Daniel Kajfes
UK STADIA PHOTOGRAPHY
Ste Jones (KT8 Photography)
Thanks to all Clubs, Media & Marketing Managers
Thanks to all the kit suppliers
SPECIAL THANKS
Shane Wakley
Kane Grzasko

Website:
trublu.com.au
Facebook:
facebook.com/trublugames
Twitter:
twitter.com/trublugames