To change your lineup, formation or strategy, select “Game Plan” from the pre-match screen or the pause menu.
GAME PLAN SCREEN
Use Assisted Settings to create Game Plans automatically with COM assistance. When you are used to it, try creating your very own Game Plan that can be customized in every detail.
・ The user who chooses the Game Plan is referred to as the Side Leader. In a VS. match, this will be the user whose user number is the lowest (e.g. User 1). (During matches, the user who pauses the game to open the game plan screen will be made leader.) ・ By selecting a player you get a quick glimpse of his capabilities in the form of a graph.
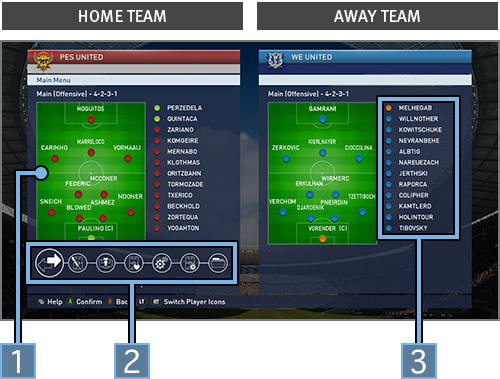
- 1Field
- 2GAME PLAN MENU
- 3SUBSTITUTES
Field Display
Press eitheror on the Game Plan screen and see the information below:
・ The icons shown in the Strip Icon / Form & Stamina Screens refer to the following:| Indicate Player Names and Positions. A player with (C) after his name is the team captain. | |
| Player form is indicated by the arrows below. |
|
| Shows Player Roles and their suitability to particular players. The Overall Ratings of the Substitutes are calculated assuming they are played in their default positions. |
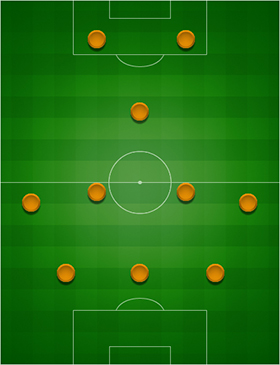
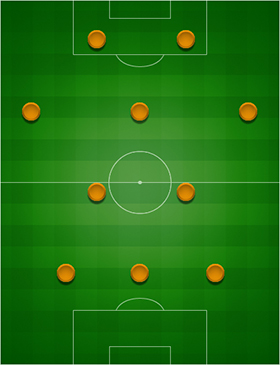
Preset Tactics

The [Preset Tactics] option allows you to choose team formations, individual player positions, mark settings as well as "Team Instructions" (the way the team plays depending on whether or not it is in possession). Useand to switch between the team instructions that will be in place when the team is in or out of possession. Choose which areas of the pitch to build up play in attack, or to contain the opposition when on defense. You can also adjust the depth of your defensive line positioning.
Tactical options
By turning "Fluid Formation" ON, you will get to choose your formation at i) Time of Kick Off, ii) When in possession, and iii)
When out of possession.
The manner in which formations then switch automatically, depending on the in-game situation, enables you to be very creative
tactically. For example, you can make wide players position themselves far up the pitch when the team is in possession, but drop
back to form part of a makeshift 5-man defense if they lose it.
■TEAM INSTRUCTIONS (Netherlands National Team)
At Kick-off
Possession
Out of Possession
TYPES OF PRESET TACTICS AND HOW TO SELECT THEM
Turning "Fluid Formation" ON allows you to choose 3 separate Preset Tactics: "Main" [Offensive], "Defensive" and "Custom." For each of them, you can create 3 formations (Formation at time of Kick Off, when the team is in possession and when the team is out of possession) giving you further flexibility and variety in setting up your team. Make use of all these options to create your master tactical plan.
-
MAIN [OFFENSIVE]
Select GAME PLAN → PRESET TACTICS -
- KICK OFF
- When in possession
- When out of possession
-
DEFENSIVE
Select GAME PLAN → TACTICAL OPTIONS → DEFENSIVE -
- KICK OFF
- When in possession
- When out of possession
-
CUSTOM
Select GAME PLAN → PRESET TACTICS → CUSTOM -
- KICK OFF
- When in possession
- When out of possession
- To switch between the 3 Preset Tactics MAIN [OFFENSIVE] , DEFENSIVE and CUSTOM matches,press UP or DOWN on your.
- When "Fluid Formation" is ON, your formation automatically switches between KICK OFF , When in possession and When out of possession during matches.
There is so much more to a match than just watching the action immediately around you.
Make sure you grasp all other key information shown on the Match Screen.
MATCH SCREEN
The below options can be turned ON or OFF by selecting “System Settings” > “Match Screen Settings.” At the end of each half, you can look back at your team’s performance up to that point in the match.
・Information shown may differ depending on which mode you are playing in.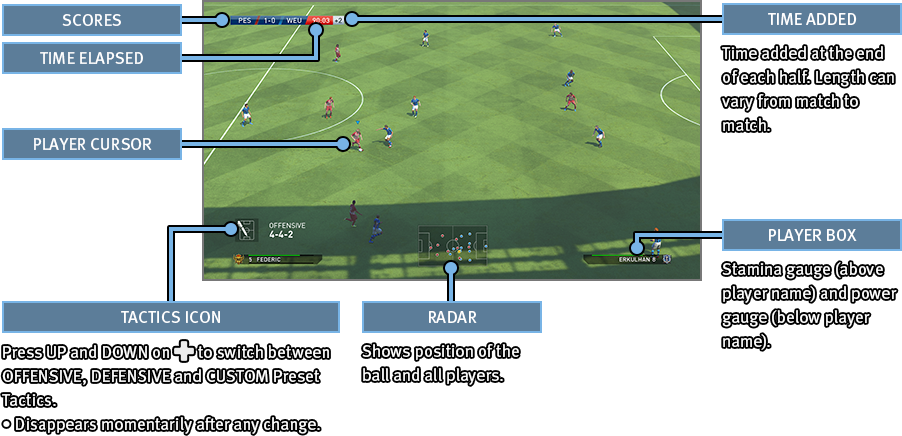
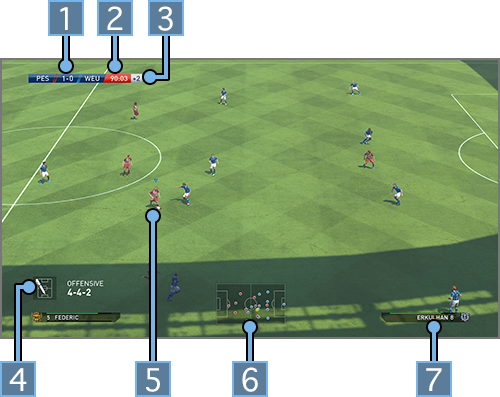
- 1SCORES
- 2TIME ELAPSED
- 3TIME ADDED
- Time added at the end of each half . Length can vary from match to match.
- 4TACTICS ICON
- Press UP and DOWN on
to switch between OFFENSIVE,
DEFENSIVE and CUSTOM Preset
Tactics.
・Disappears in a while after any change.
- 5PLAYER CURSOR
- 6RADAR
- Shows position of the ball and all players.
- 7PLAYER BOX
- Stamina gauge (above player name) and power gauge(below player name).
PLAYER CURSOR
The Player Cursor will be displayed above the player you are currently controlling. This Cursor can change color depending on the player’s status. Cursor Settings such as Cursor Name and how to change Cursors can be configured under Support Settings.
| Standard Player Icon A yellow card icon will be displayed next to the player name if he is booked. | |
| Indicates that the player is in an Off side Position (Only applies if the Cursor is set to Fixed in Cursor Settings). |
WHAT DO THE GAUGES MEAN?
The Power gauge will be shown at the player’s feet when he is passing or shooting.
・When taking Set Pieces, the Power Gauge will be shown above the Radar. ・To display Help Guides such as Directional guides (when passing manually), Target guides (highlighting the selected player) or Positional guides (indicating a player’s optimum position), please enable the respective settings in “Support Settings.”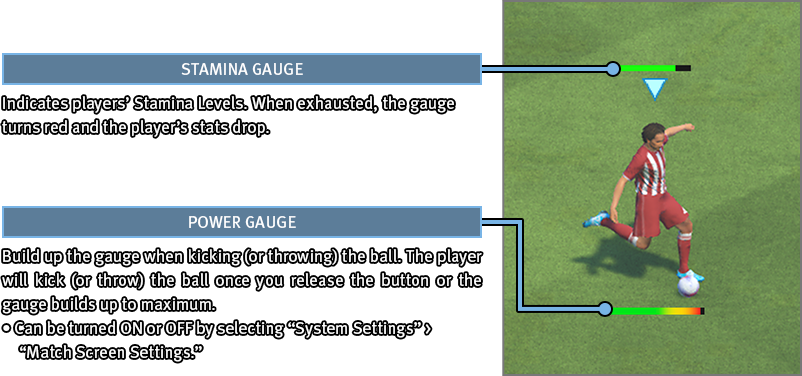
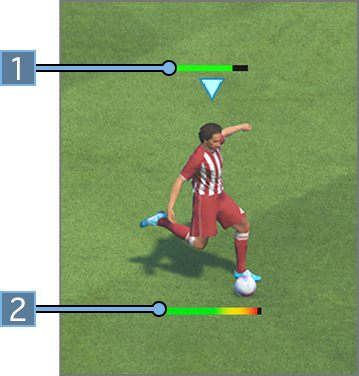
- 1Stamina Gauge
- Indicates players’ Stamina Levels. When exhausted, the gauge turns red and the player’s stats drop.
- 2Power Gauge
- Build up the gauge when kicking (or
throwing) the ball. The player will kick
(or throw) the ball once you release
the button or the gauge builds up to
maximum.
・Can be turned ON or OFF by selecting “System Settings” > “Match Screen Settings.”
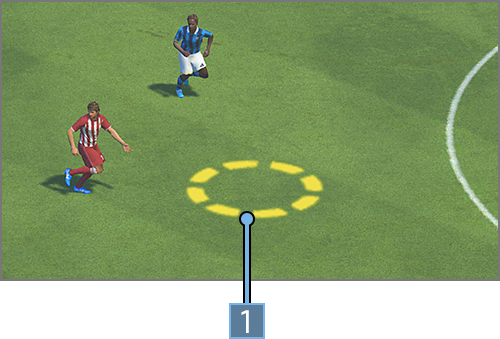
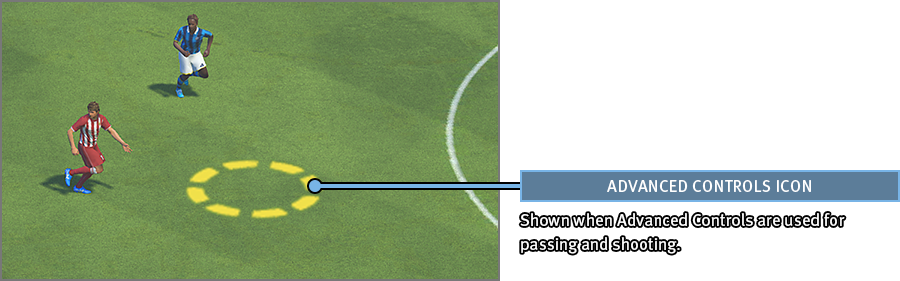
- 1ADVANCED CONTROLS ICON
- Shown when Advanced Controls are used for passing and shooting.
SUBSTITUTION ICON
The below icons will be shown when making a substitution.
| Player | |
| Player OFF |
Pause Menu
The Pause Menu can be opened by pressingduring a match. For a detailed explanation on what each option does, please read the related Help Text on screen. To return to the match from the Pause Menu, simply press either the or thebutton.
See here for details on the Xbox 360® Controller and key in-game controls.
For more details on in-game Controls, please refer to the game's Pause Menu.
All inputs using the Left Stick can be substituted using the D-Pad by changing the "Player Movement" settings
under "Button Configuration."
Controls when in possession
Controls when out of possession
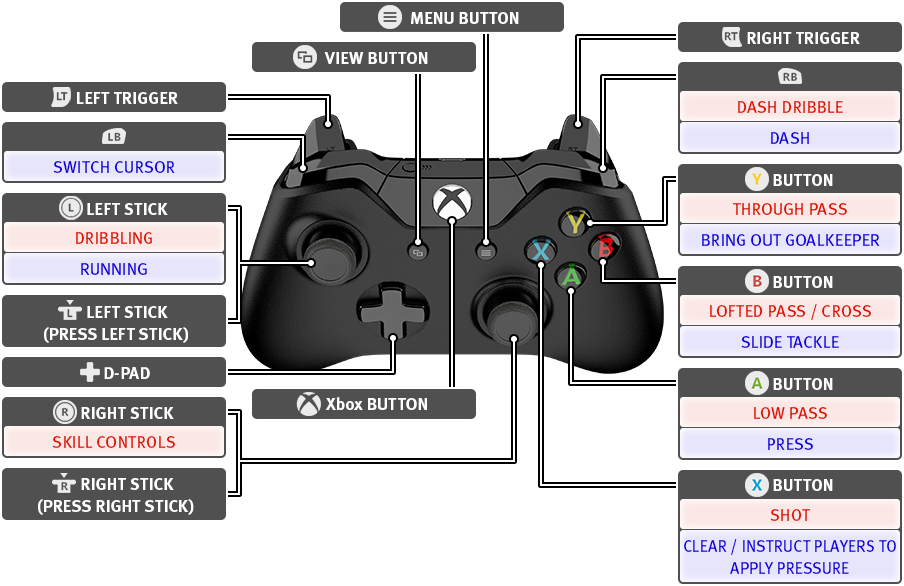
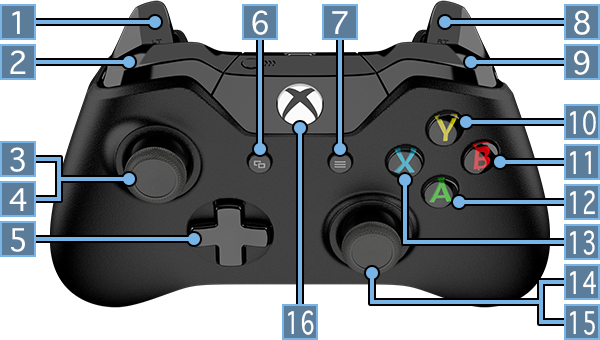
- 1LEFT TRIGGER
- 2LB
- SWITCH CURSOR
- 3Left Stick
- DRIBBLING
- RUNNING
- 4LEFT STICK (PRESS LEFT STICK)
- 5D-Pad
- 6VIEW BUTTON
- 7Menu button
- 8RIGHT TRIGGER
- 9RB
- Dash Dribble
- Dash
- 10BUTTON
- THROUGH BALL
- BRING OUT GOALKEEPER
- 11BUTTON
- LOFTED PASS / CROSS
- SLIDE TACKLE
- 12BUTTON
- Low Pass
- PRESS
- 13BUTTON
- Shot
- CLEAR / INSTRUCT PLAYERS TO APPLY PRESSURE
- 14Right Stick
- SKILL CONTROLS
- 15RIGHT STICK (PRESS RIGHT STICK)
- 16Xbox BUTTON
・= Left Stick,= Right Stick.  = Directions on either / or.
・All controls using the can be substituted with . (In Personal Data Settings).
・All controls listed in this manual assume the player is facing the
= Directions on either / or.
・All controls using the can be substituted with . (In Personal Data Settings).
・All controls listed in this manual assume the player is facing the direction.
Controls (both when in possession and out of possession) that apply to the single player under the user's control. Think you're good at outwitting people? Then give it a try!
CONTROLS WHEN IN POSSESSION
PASS / SHOOT
Use to direct both your shots and passes. Note that the fl ight of the ball is very diff erent for each type of pass.
| Low Pass | |
|---|---|
| Low Through Ball | |
| FLY-THROUGH PASS | + |
| LOFTED PASS / CROSS | |
| LOW CROSS | X 2 |
| Shot |
DRIBBLING
While dribbling, press to sprint with the ball. But remember that this also reduces ball control. Use both types of dribbling at the appropriate times.
| DRIBBLING | |
|---|---|
| Dash Dribble | + |
SKILL CONTROLS
Use both and to pull off feints and dummies (e.g. Rotate full 360).Use your spatial awareness to the fullest to pull off the right trick!
| SHIFT BALANCE | |
|---|---|
| MOVE BALL |
CLOSE CONTROL
If you need to keep close control of the ball, press while dribbling to exercise CLOSE CONTROL. This skill allows you to constantly face the opposition’s goal while keeping your opponent at arm’s length when looking to pass him or maintain ball control in restricted space.
| CLOSE CONTROL |
|---|
Speed Burst
Quickly press twice when dribbling to pick up a quick burst of speed. While this is an effective way to lose your marker, get it wrong and it can backfi re on you.
| Speed Burst | + x 2 |
|---|
When out of possession
PRESSURE
Press to pressure a player who is on the ball. By pressing both and , you can make your player sprint as he closes in on his opponent.
| PRESS | |
|---|---|
| CHASE DOWN | + |
SLIDE TACKLE
Press to lunge feet-first at an opponent in an attempt to win back the ball. While the returns are high so are the risks, and a mistimed challenge can easily result in a foul being called or something far worse.
| SLIDING TACKLE |
|---|
TACKLE
Press quickly twice to get your player to stick his leg out in an attempt to win back the ball. While the returns are high so are the risks, and a mistimed challenge can easily result in a foul being called or something far worse.
| TACKLE | x 2 |
|---|
JOCKEYING
When defending, press + to lock in on your opponent and track him. JOCKEYING also slightly enhances your ability to tackle making it relatively easier to deal with opponents who exercise CLOSE CONTROL or pull tight turns.
| JOCKEYING | + |
|---|
See here for a list of team moves executed in tandem with teammates such as off-the-ball movements and multiple pressure strategies.
CONTROLS WHEN IN POSSESSION
PASS & MOVE
Press just as the player is about to pass the ball if you want him to start a run as soon as he gets rid of the ball.
| PASS & MOVE | Pass + |
|---|
ONE-TWO
Hold as you play a low pass. Press as the ball receiver receives the pass to get him to play a quick return ball. This is an effective way to lose your marker.
| ONE-TWO | + → |
|---|---|
| CHIPPED ONE-TWO | + → + |
TEAMMATE CONTROLS (ASSISTED)
Press , then push towards a player of your choice. Release to make him go on a straight run.
| TEAMMATE CONTROLS (ASSISTED) | + |
|---|
TEAMMATE CONTROLS (MANUAL)
Hold , then push then release . Keep holding , then push again to control the direction of the run your teammate makes.
| TEAMMATE CONTROLS(MANUAL) | + → |
|---|
When out of possession
INSTRUCT A TEAMMATE TO APPLY PRESSURE
The COM-controlled teammate closest to the opposing player on the ball will apply pressure.
| INSTRUCT A TEAMMATE TO APPLY PRESSURE | Hold |
|---|
MULTI-PLAYER PRESSURE
Press twice, then continue to hold the button to get 2 or 3 players to apply pressure on your opponent. While it is a very effective way to win the ball, it can potentially lead to large openings for your opponent to exploit.
| MULTI-PLAYER PRESSURE | x 2 (then hold) |
|---|
Defensive Line Control
Push the defensive line further upfield or pull it back deeper as you feel necessary. Controls may change depending on side / camera angle, and how much the line moves each time depends on the team's game plan.
| Defensive Line Control | Left / Right on |
|---|
Offside Trap
Push the defensive line further upfield for a short time. Note that control functions may change depending on side / camera angle.
| Offside Trap | Right on X 2 |
|---|
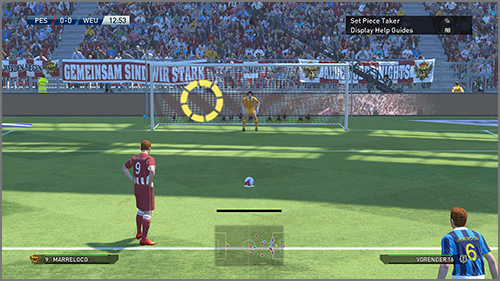
Set Pieces are all about anticipation. Use the help guides to work the perfect set piece routine.
HELP GUIDES
Press to display help guides when taking a free kick or penalty.
-
Free Kick
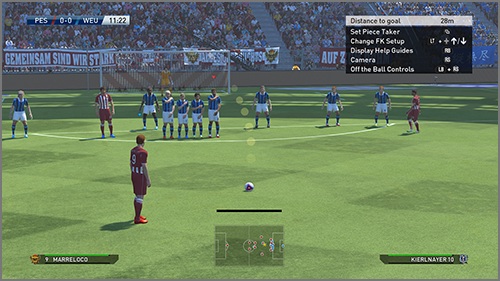
Press to show / hide help guides. The guides give you a rough idea of the ball's expected trajectory.
-
PK's
Hold to show help guides. The guides show the direction the shot is likely to go.
FREE KICK CONTROLS
The accuracy of help guides shown during set pieces at shorter ranges tend to be more accurate for players with better dead ball capabilities.
FREE KICK TAKER
Use to direct your free kick, while using to choose the elevation and degree of spin you put on the ball. If you want to go for placement, just momentarily press Similarly, if you are going for more power, press the button longer to allow the power gauge build up. To display the help guides showing the projected flight of your free kick, press .By pressing , you can control the power and trajectory of your free kick and ignore all further input.
| PASSING | / / |
|---|---|
| SHOOTING | |
| ADJUST TRAJECTORY |
Low /
 High /
Left Spin / High /
Left Spin /
 Right Spin Right Spin
|
| DIRECTION | |
| HELP GUIDES | |
| FIX TRAJECTORY |
LINE UP 2 FREE KICK TAKERS
Line up 2 free kick takers to keep your opponents guessing. How about one playing a short lay off to the other or even stepping over the ball? They can both work very well.
・To control the second free kick taker, press.| TRICK FREE KICK | → |
|---|---|
| Lay Off | → |
DEFENDING AGAINST FREE KICKSS
Players in the defensive wall can either jump (press ) or charge down a free kick (press ). Look at the ball's elevation before deciding what to do.
| Jump | when the ball is struck |
|---|---|
| Charge Down | when the ball is struck |
GOALKEEPER’S POSITION
Push while holding to make the goalkeeper move toward the desired direction. This can be done up to the moment the ball is struck.
| GK Positioning | + |
|---|
PENALTIES
PENALTY TAKER
Like free kicks, the power gauge can be used as an indication of the shot’s velocity and accuracy. While a chipped penalty can be easily saved if read by the keeper, it is still a very effective way to surprise him.
| STANDARD PENALTY | |
|---|---|
| CHIPPED PENALTY | + |
| HELP GUIDES |
GOALKEEPER
Push to adjust position (until the penalty taker strikes the ball). Pushbefore ball is kicked to react to hard shots or after to react to softly taken shots.
| GK Positioning |
|---|
A goalkeeper's role isn't just restricted to saving shots or catching crosses. What he does after that is just as important. Try triggering attacks from throws and punt kicks and keep opponents guessing by using faked passes.
DEFENSIVE CONTROLS
All controls with the exclusion of bringing out the goalkeeper only apply if the cursor is placed on the goalkeeper
Bring out the Goalkeeper
The keeper runs toward the ball and claims it. A safe way to reclaim the ball although it can leave you completely exposed if you do it wrong.
| GK Dash | + Hold |
|---|---|
| BRING OUT GOALKEEPER | Hold |
AUTO-POSITIONING
Hold to automatically adjust the goalkeeper’s position.
| AUTO-POSITIONING | Hold |
|---|
BLOCK / TACKLE
Push thento make the keeper make a diving save, or then twice to get down and make a tackle.
| Block | |
|---|---|
| GK Tackle | x 2 |
GK Trap
Get the keeper to trap the ball rather than catch it.
| GK Trap | Holdwhen receiving ball |
|---|
Off-the-ball Controls
PUNT KICK / THROW
Push in the desired direction when kicking or throwing the ball.
| Punt Kick | |
|---|---|
| THROWING | |
| Throw into Space |
RUNNING / DASH
Run while holding the ball. Press to sprint.
| RUN | |
|---|---|
| Dash | + |
OTHER CONTROLS
When passing the ball, press just before the keeper kicks or throws the ball to fake a pass.
| PUT DOWN / PICK UP BALL | |
|---|---|
| FAKE PASS | Pass → |
See here for other more advanced controls. They may be difficult to start with, but mastering them will add yet another dimension to your game! The sections in green are shared (both offensive / defensive) controls.
CONTROLLED SHOT
Holding when shooting allows you to take a shot that sacrifices power for added accuracy. Use it if you are shooting inside a crowded 18-yard box or if you really have to hit the corners.
| CONTROLLED SHOT | + |
|---|
TRAP FEINT
Press + as you trap the ball to let it go through you, and then give chase (as opposed to taking a touch to control it).
| Trap | |
|---|---|
| Trap Feint | →+ |
CHIP SHOT
Press and to lob the ball over the goalkeeper and into an empty net.
| CHIP SHOT | + |
|---|
QUICK STOP THEN FACE GOAL
Release then press to face the opposition’s goal. Do this while dribbling
if you want to come to a sudden stop while still facing the opposition’s goal.
| Quick stop then face opposition’s goal |
|---|
Knock-on
Whilst stationary, press followed then push in the desired direction to take a touch and set yourself up for a shot or pass. Doing this improves the accuracy of the subsequent shot or pass.
| Knock-on | Knock-on + *Whilst Stationary |
|---|
Manual Cursor Change
Press to move the cursor and take automatic control of the player closest to the ball. Push in the direction of a particular player if you want to manually override this.
| Cursor Change | |
|---|---|
| Manual Cursor Change | + |
These are controls shared by both attack and defense. Learn them because you never know when they might be useful.
Super Cancel
Press +to cancel whatever action the player was about to take and regain full control. This includes shooting or passing.
| Super Cancel | + |
|---|
CHANGE STRATEGY
Press the Up / Down on to change strategy. The required buttons may change depending on the camera angle.
| CHANGE STRATEGY | Up / Down on |
|---|
SWITCH CAMERA (FIXED CAMERA)
Press to change the camera angle between the ball and the players on the pitch.
| Switch Camera |
|---|
IN-GAME CHAT (TEAM PLAY LOBBY ONLY)
When off the ball, hold, then push, , , to
communicate with your teammates using pre-selected chat
messages. This is for matches in TEAM PLAY LOBBY only.
| In-game Chat | + |
|---|
By selecting "Options" then "Personal Data Settings", you can play the game using Advanced Controls by setting "Shot Type" and "Through Ball Type" to "Advanced".
Shooting (Advanced)
Advanced shooting gives you full control of both the power and placement of your shots. Push to place your shot while also using the power gauge to set the power.
| Shooting (Advanced) | |
|---|---|
| AIM FOR BOTTOM LEFT CORNER |  |
| AIM FOR TOP LEFT CORNER |  |
| AIM FOR BOTTOM RIGHT CORNER |  |
| AIM FOR TOP RIGHT CORNER |  |
Through Ball (Advanced)
Advanced passing allows you to pinpoint your passes as opposed to just playing them in the general direction you want. Use both and the power level to place your passes exactly where you want them.
• Move the Advanced Control Icon in a circular arc to apply curl, or pull it back to apply back spin (Please refer to "Match Screen" for Advanced Control Icon).| Through Ball (Advanced) | |
|---|---|
| DIRECTION CONTROL |